.webp)
Notion tutorials can be overwhelming, and it's often hard for new users to know where to start.
Well, you've just found the right place if you want to learn the basics of Notion in less than 10 minutes with the simplest Notion tutorial for beginners.
I am a certified Notion expert and in this Notion guide, I'll show you everything you need to know to understand all Notion fundamentals, how Notion works, and how to get started easily.
Additionally, a great way to understand Notion's capabilities is by exploring our selection of free Notion templates for productivity, business, project management, habit tracking, and more.
{{cta-1}}
Pricing & Plans for Your Notion Workspace
Before diving into the basics of Notion, you might wonder: can I use Notion for free? The quick answer is YES!
Notion offers an extensive free plan that allows you to use most of its features, especially if you are using it for personal purposes.
Notion’s free plan may also work for your business needs if you are part of a small team.
Here's a closer look at what each plan offers and how they differ:
- The Free plan is perfect for individuals, providing unlimited blocks, basic page analytics, a seven-day page history, files uploading up to 5 MB, and the ability to invite up to 10 guests. Ideal for personal project management, task management and organization at zero cost.
- For small teams, the Plus plan costs $10 per user per month ($12 if billed monthly), and includes unlimited blocks for teams, unlimited file uploads, a 30-day page history, and the capacity to invite up to 100 guests.
- Larger organizations can benefit from the Business plan at $15 per user per month ($18 billed monthly), which expands on the Plus features with SAML SSO, advanced page analytics, a 90-day page history, and the ability to invite up to 250 guests.
- For enterprises requiring more extensive control and support, the Enterprise plan offers more options, with pricing available upon contact with sales.

Additionally, you can try Notion AI which is available for an additional $8 per member per month with annual billing ($10 monthly). This feature enhances your Notion accounts with AI capabilities, including Q&A for instant answers, Autofill for pulling insights from extensive documentation, and a writer tool for brainstorming and drafting documents.
Now, let’s move on to understanding the basics of Notion, starting with Notion pages.
Notion Pages (And Sub-pages)
In Notion, the way we keep and arrange our information mainly involves using pages and sub-pages within those.
Understanding how to effectively create and navigate these pages is important for anyone looking to make the most out of Notion setup.
Let’s explore these aspects in detail Notion tutorials, focusing on creating pages and navigating them within Notion.
Creating Pages and Sub-Pages
Creating a page in Notion is the first step towards building a structured repository of your notes, tasks, databases, and more. Each page you develop within Notion serves as a new canvas, allowing you to incorporate any type of content you want.
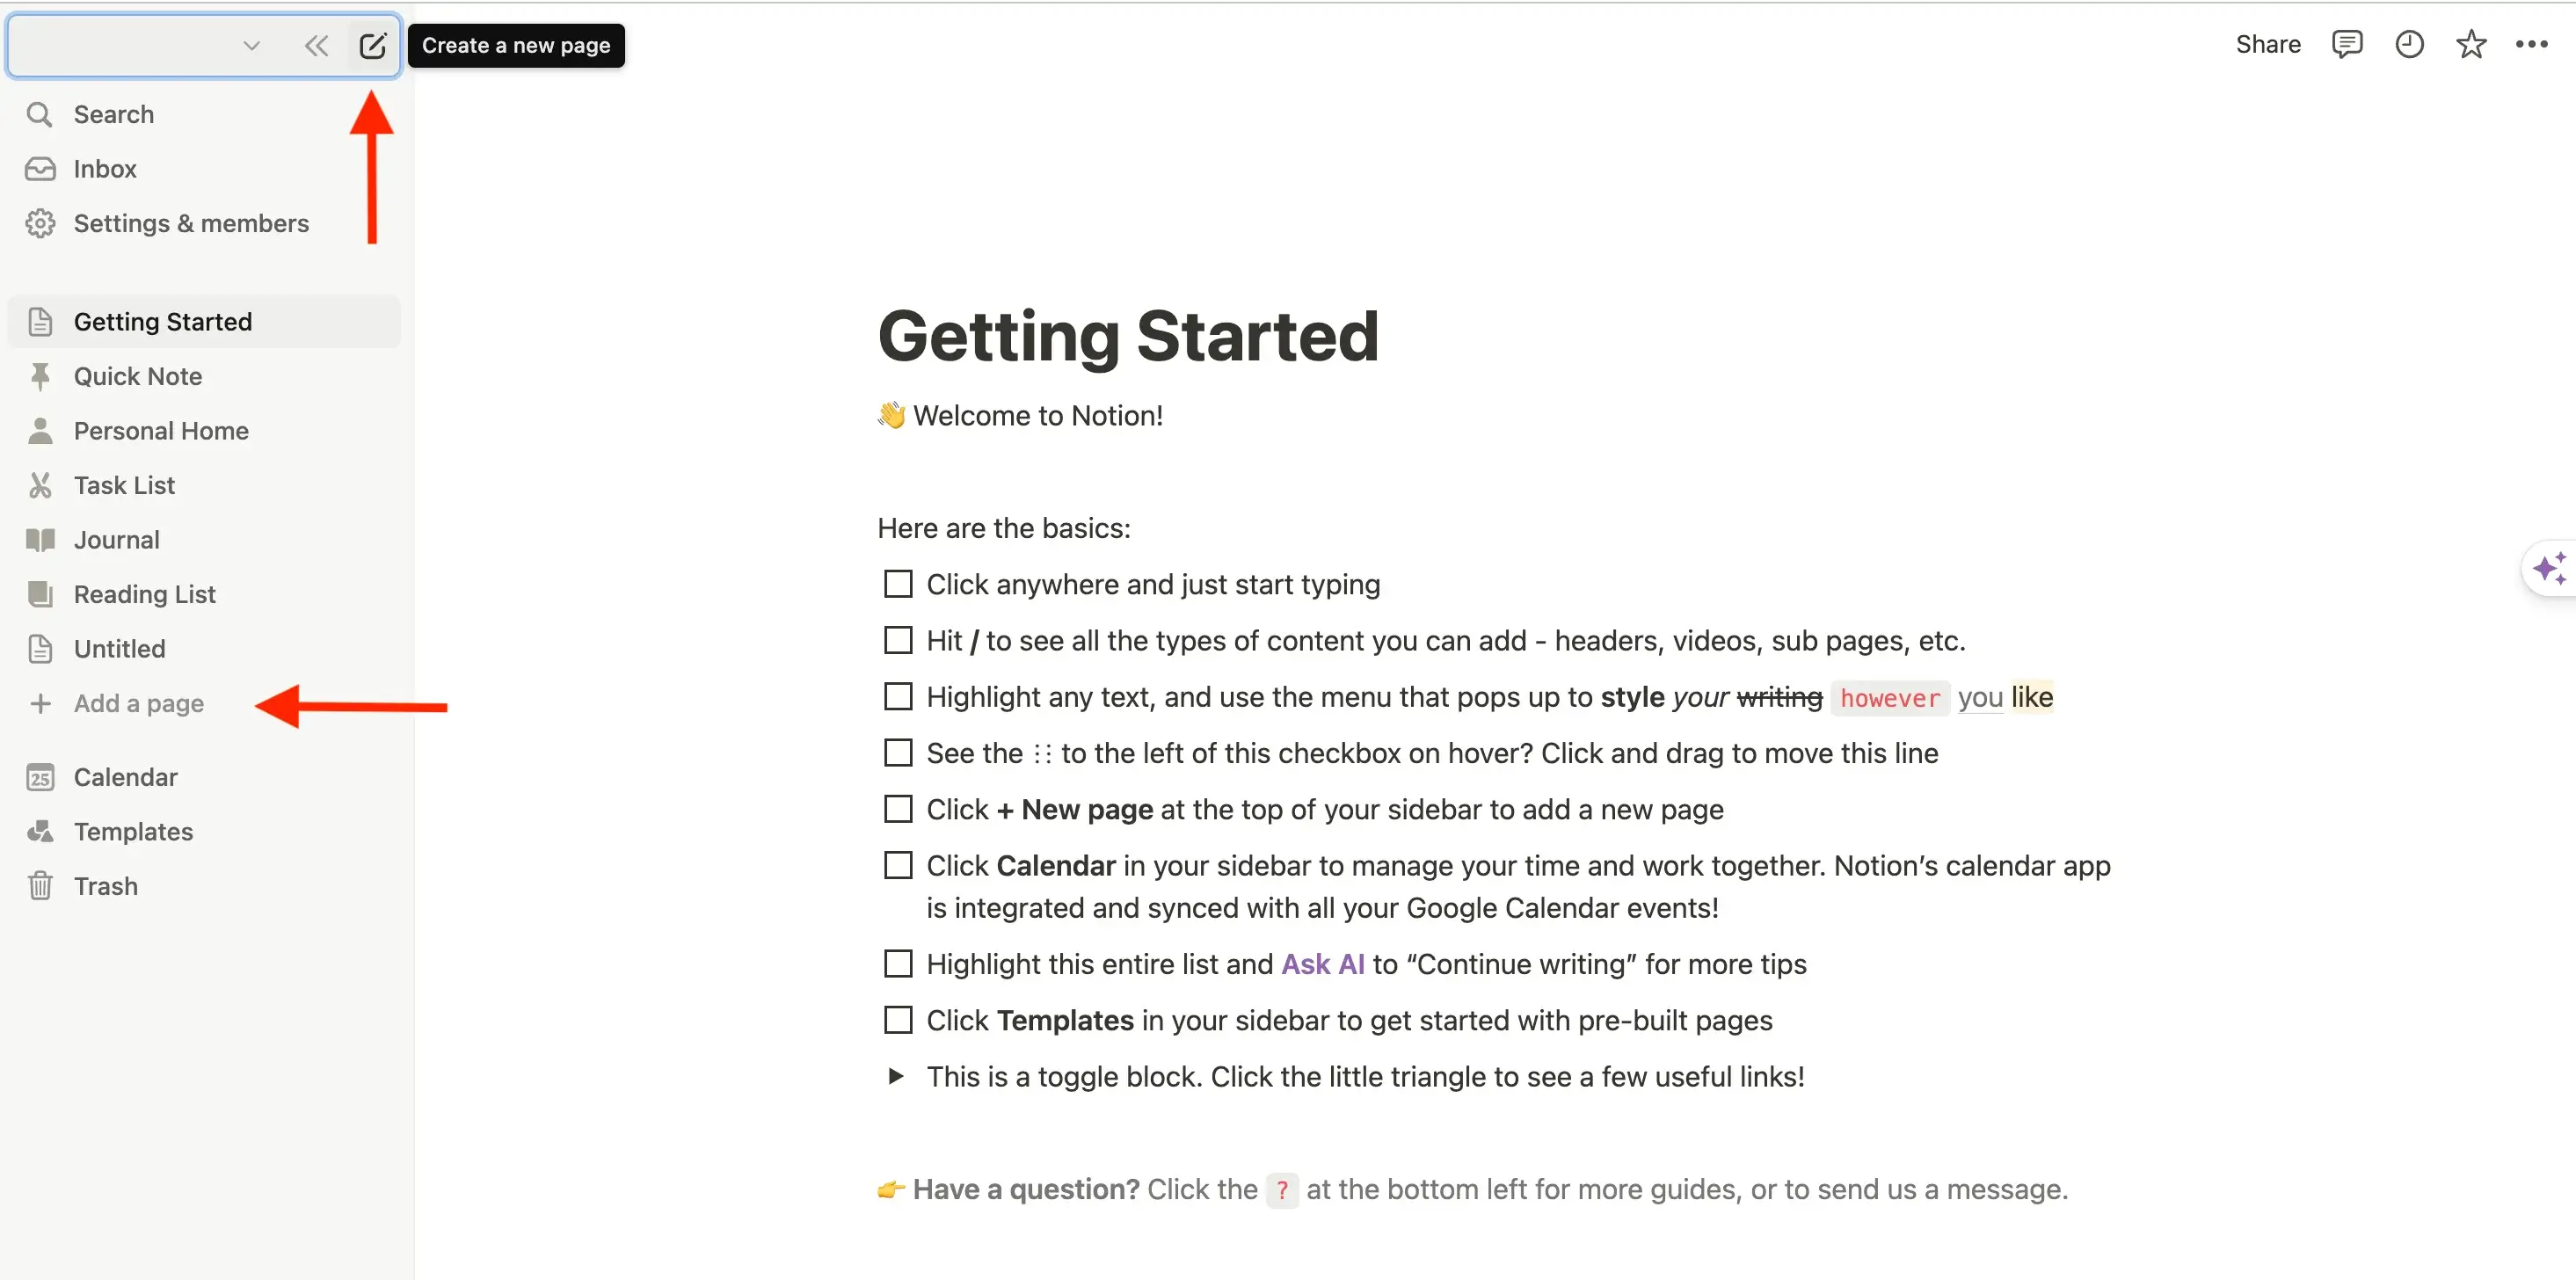
There are a few ways to add a new page in Notion:
- Click "New Page" at the top of your left sidebar
- If you’re on the desktop app, use the shortcut cmd/ctrl + N
- On a mobile device, press the "+" located at the bottom of the screen
Users have the flexibility to decide where their new page should reside, be it within another page (making it a sub-page) or at the workspace's root level.
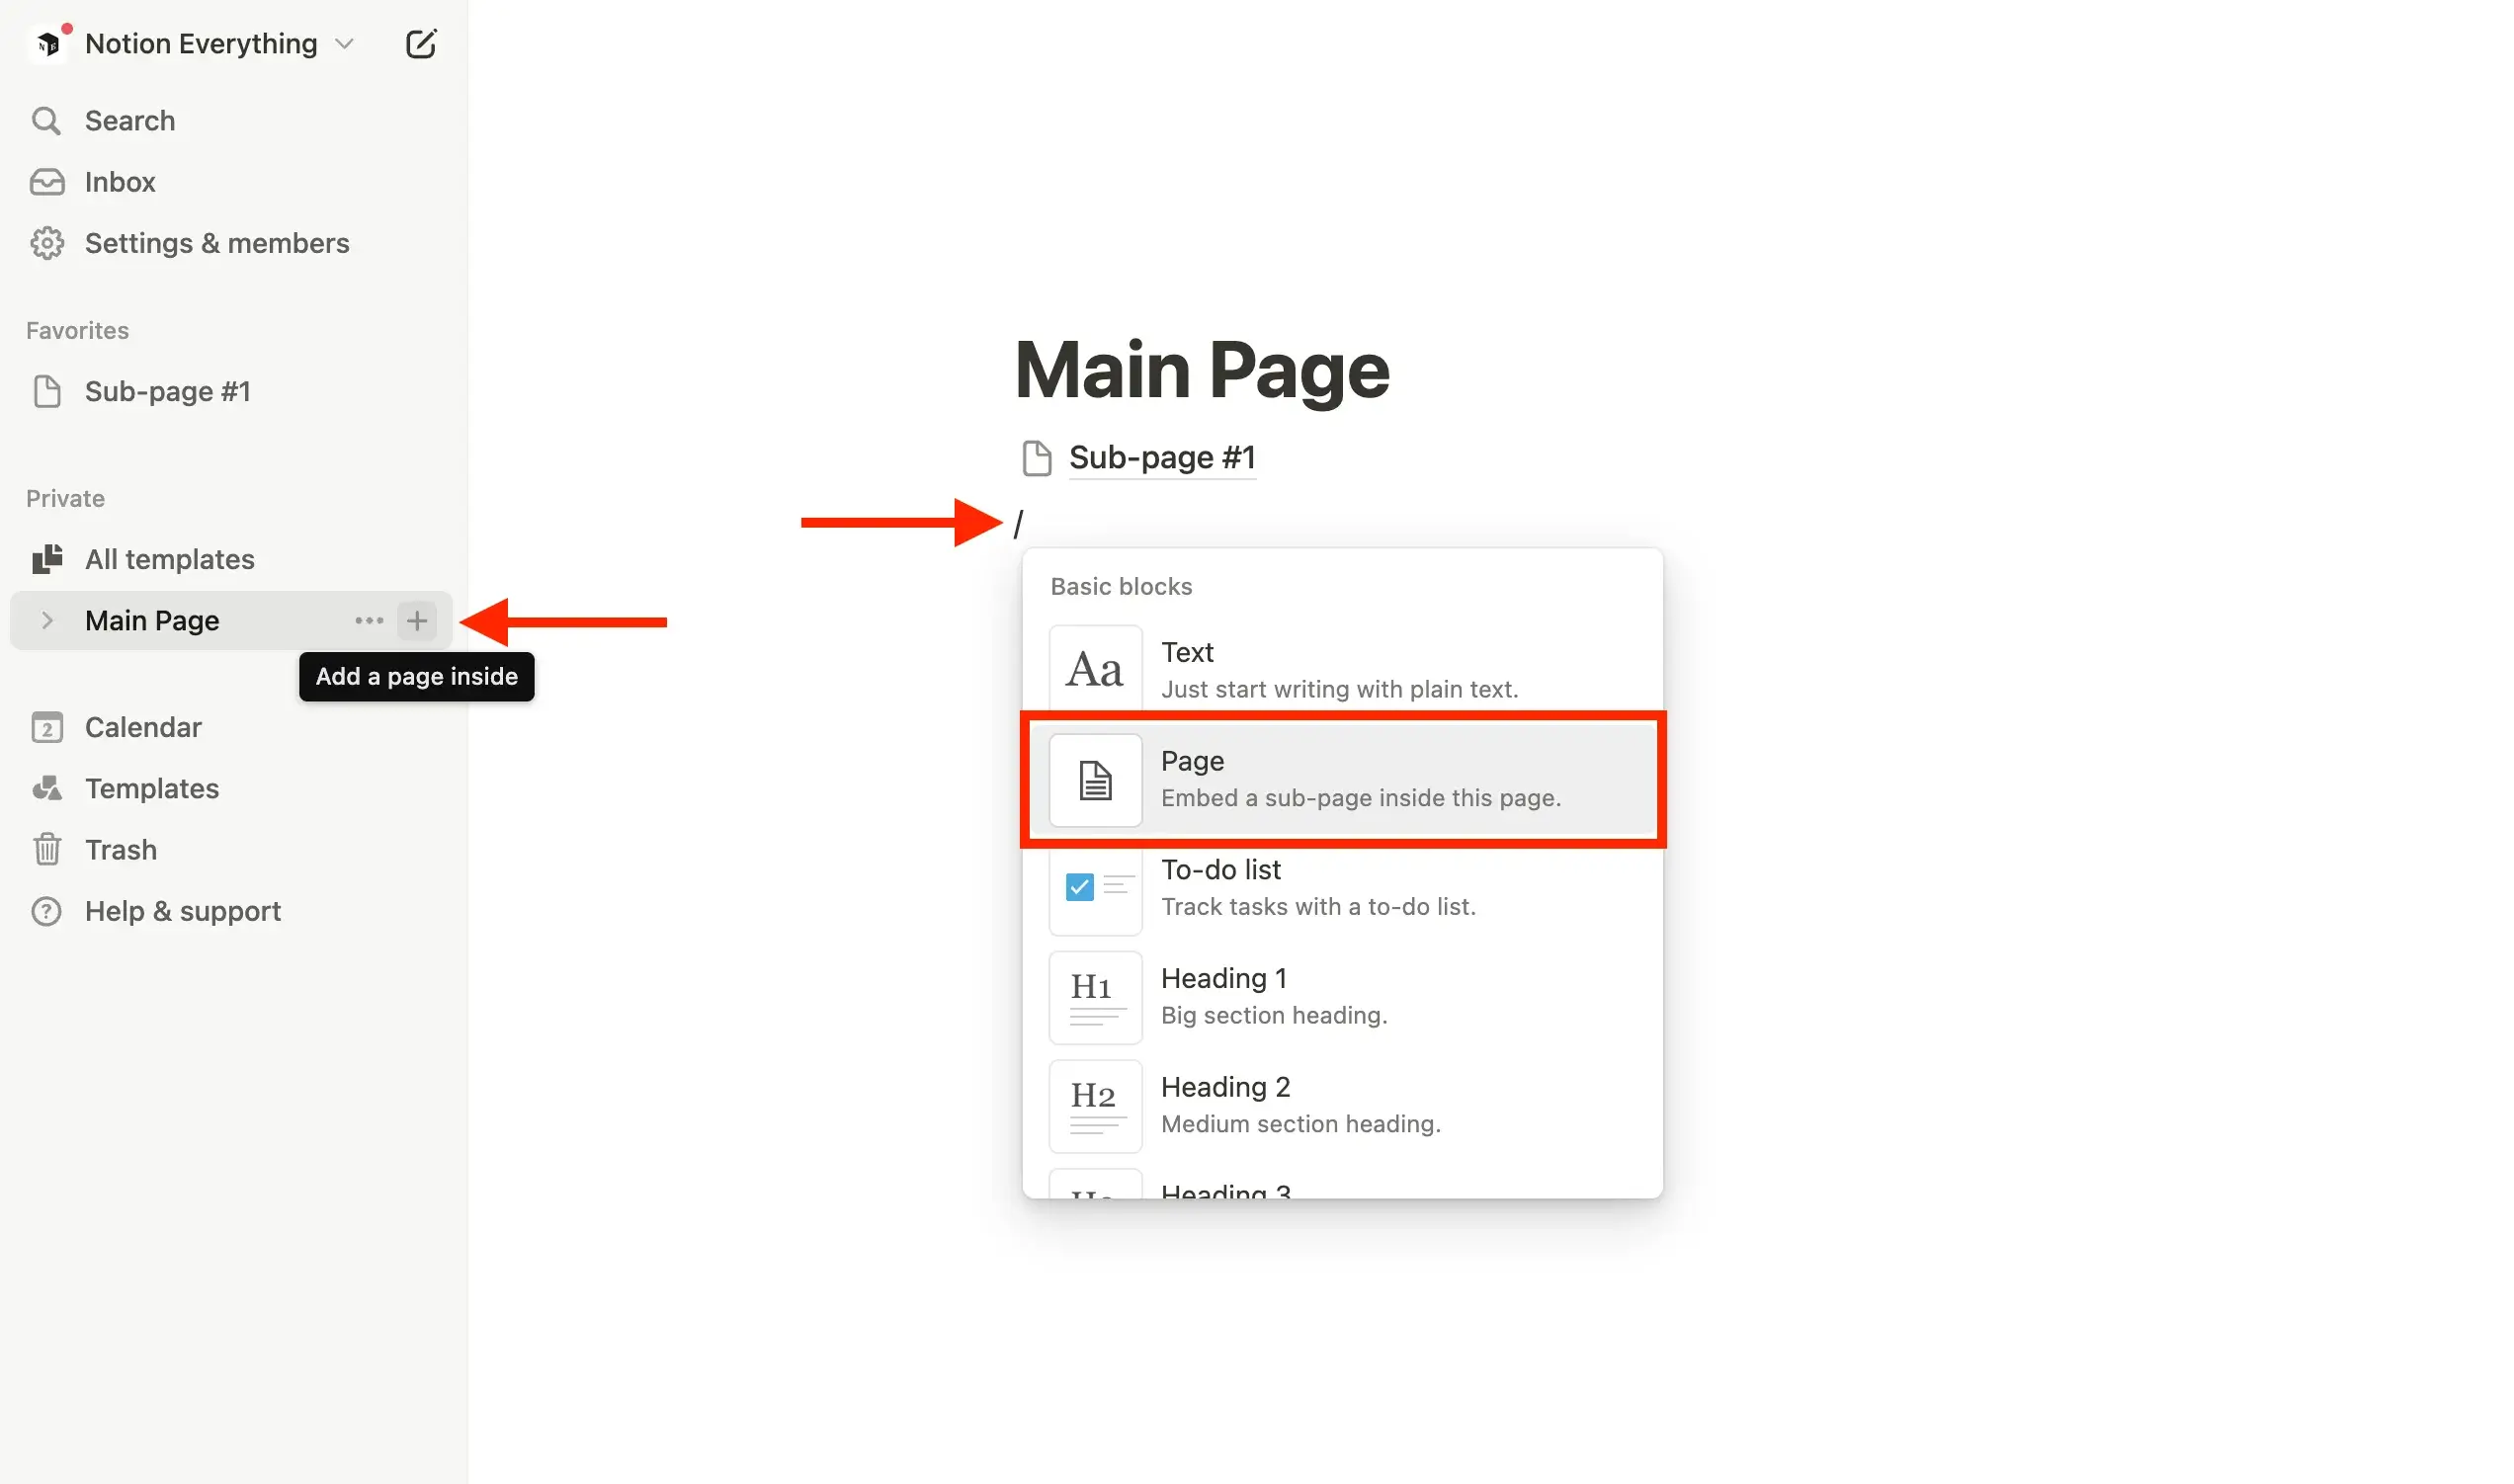
To create a sub-page:
- Use the slash command (/page) on the page you want to nest it under
- Opt to add a subpage directly from the sidebar by clicking the + next to your chosen parent page
This new subpage acts as a perfect spot for jotting down ideas or information related to the main page.
Navigating Pages
Once you've got your page or subpage Notion setup, you might wonder how to navigate this nested structure. Notion simplifies this with the sidebar, breadcrumbs, and in-page Links.
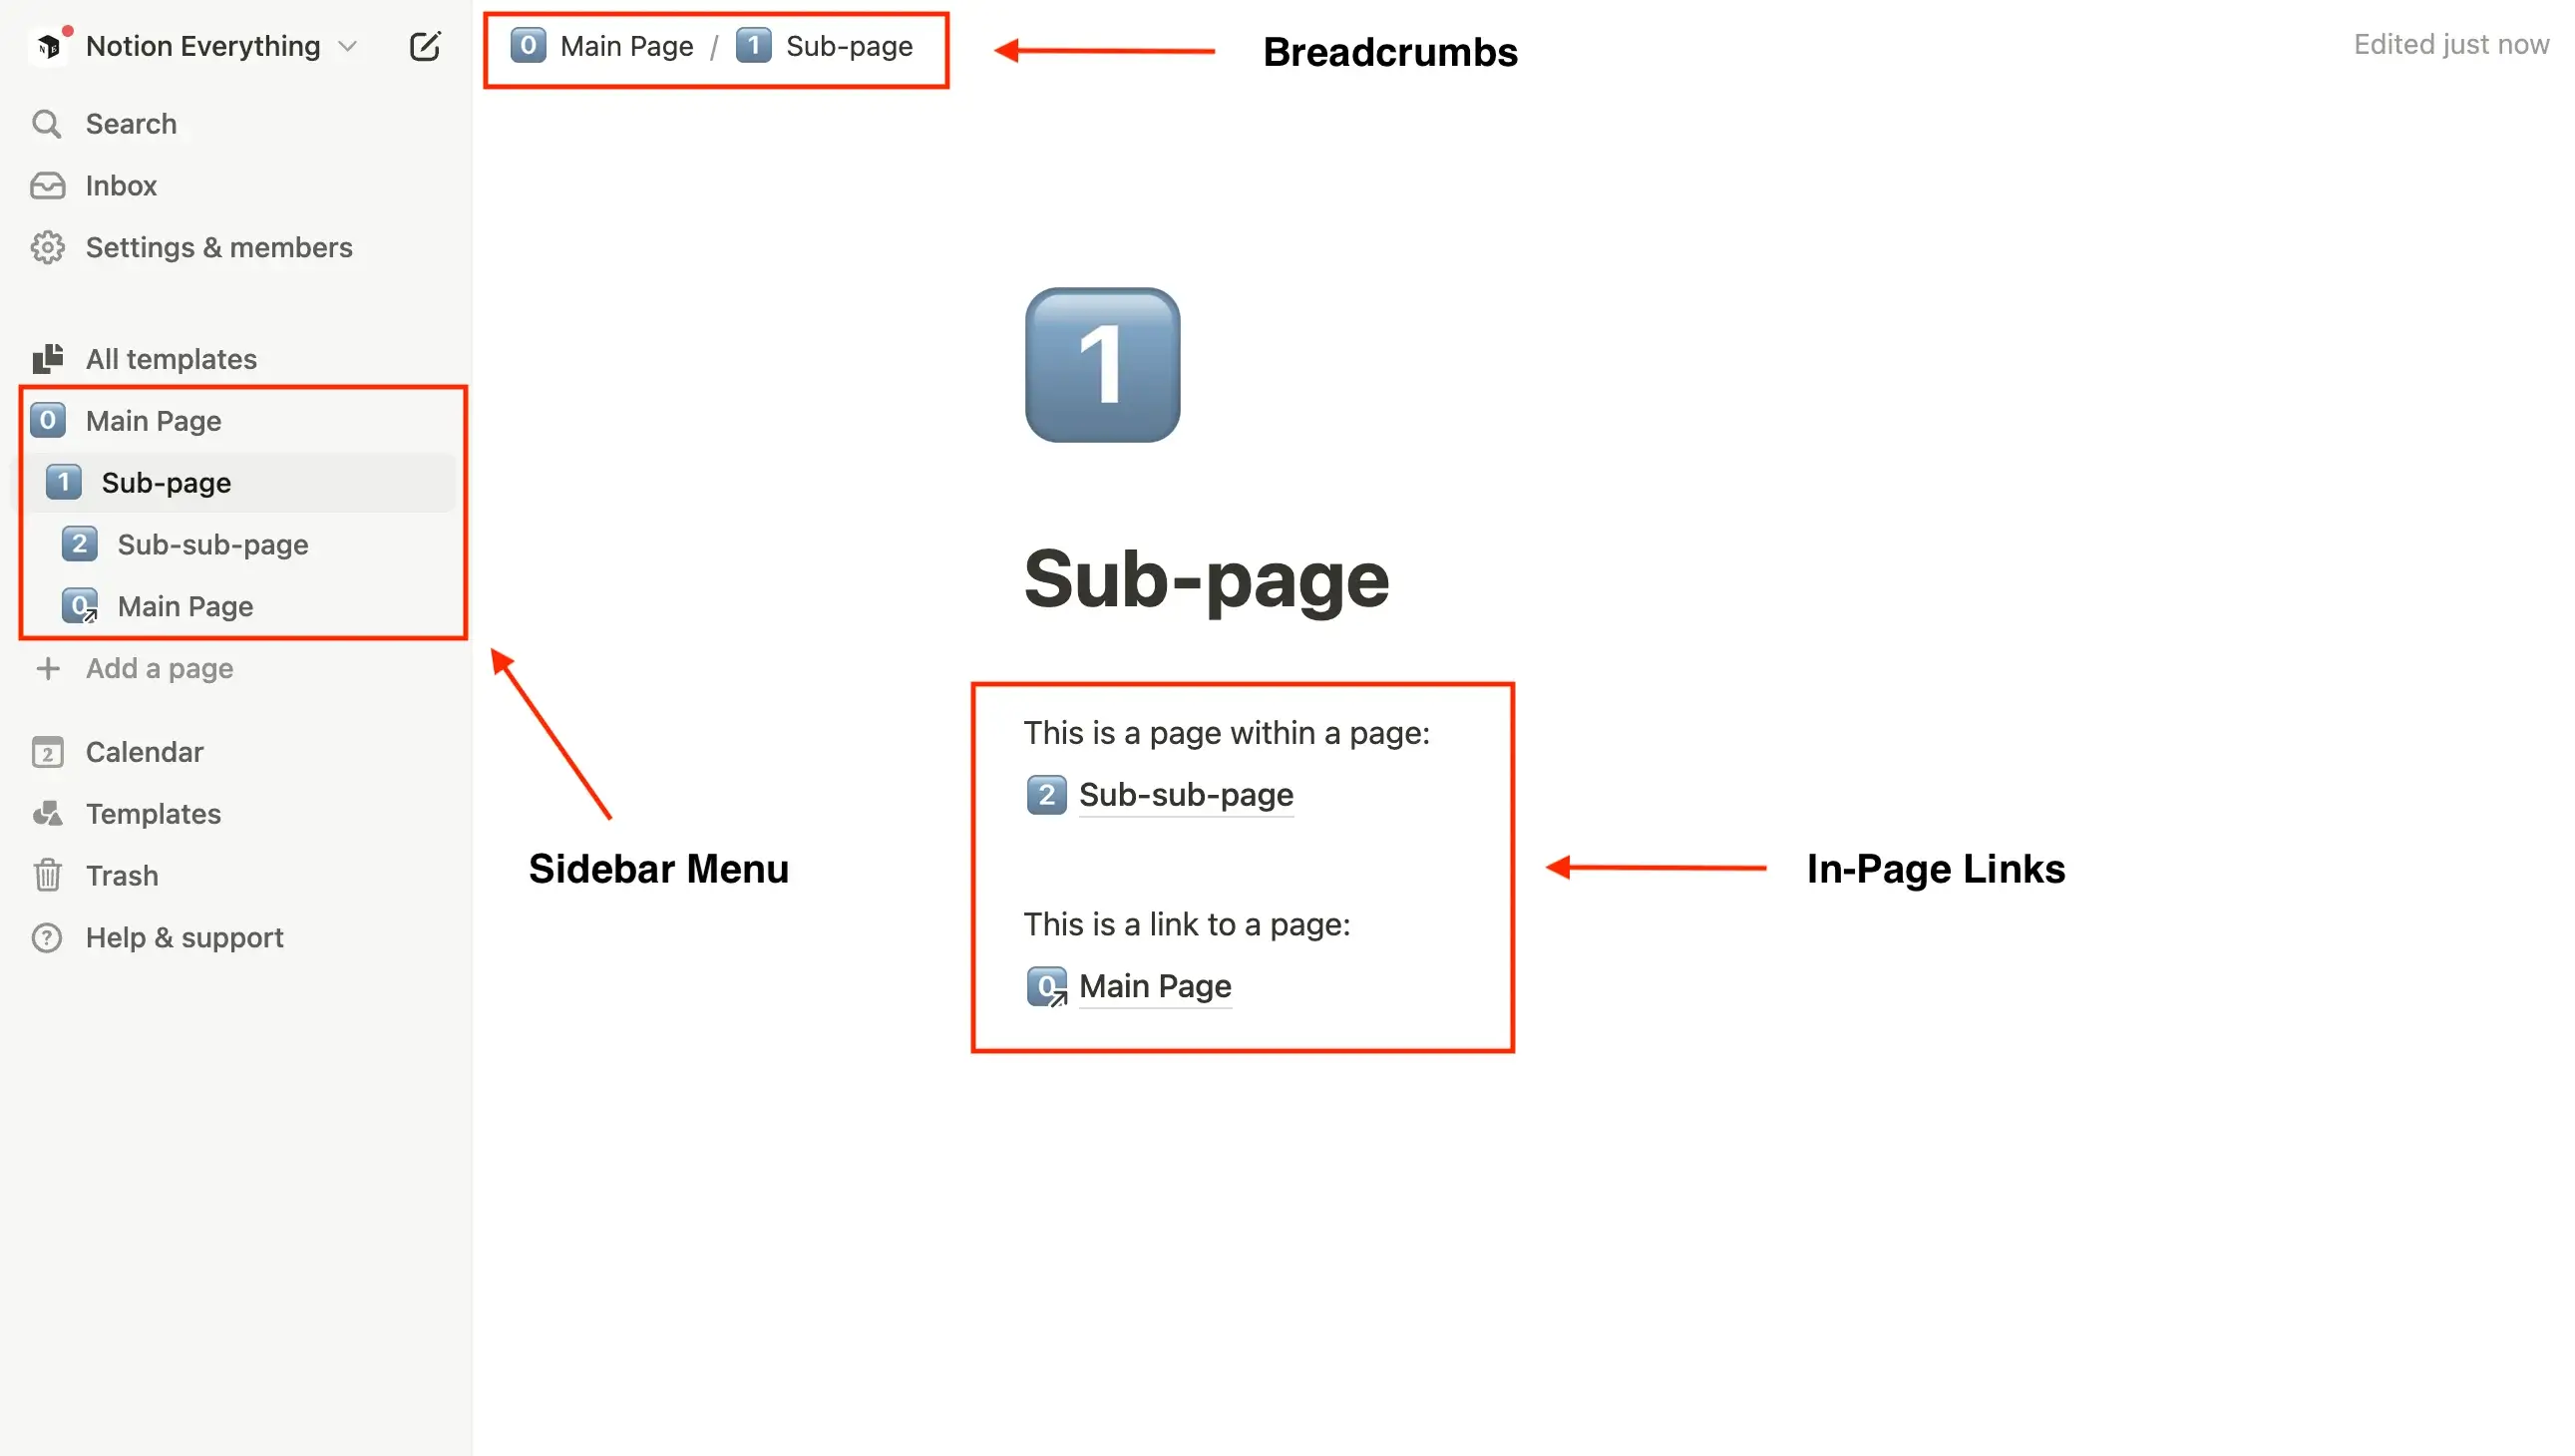
There 4 main ways of navigation in Notion:
- Sidebar menu: It’s a primary navigation tool, where all your pages are listed hierarchically. Clicking on a page title will open it in the main window. If a page contains sub-pages, these will be displayed either in the body of the page or in the sidebar
- Breadcrumbs: They’re located at the top of each page. These indicate the path taken through your page hierarchy and allow you to quickly move up or down levels
- In-Page Links: Within a page, you can create links to other pages or blocks, providing a way to jump directly to related information
- Search function: Accessible by pressing “Ctrl” or “Cmd” + “P”, enables you to find any page within your workspace by typing keywords related to the page’s content or title
And if you're looking to rearrange your workspace, you can move subpages either out of their current parent page to stand alone or into another page, allowing you to restructure your content effectively.
This means as your job changes, the way you organize can change too, making sure everything stays neat and easy to find.
Blocks
Let’s dive into the fundamental building components of any Notion page - blocks.
Notion's structure is based on blocks, which are like separate components of content such as text, images, videos, or embeds. You can stack them vertically or arrange them in any way you prefer.
Basically, Notion is an endless container of construction pieces. Construct anything you desire, in any way you prefer. Each page you make in Notion is put together using numerous "blocks".
Basic Blocks
To add a new block in Notion, you have to:
- Open Notion page or click "Add a page" on the Notion side panel to create a new page
- Choose "Empty page" and click on the "+" button to add a new block
- From the listed Notion selection, select the type of block you want to add

Starting with the basics, the 'Text Block' is the most straightforward type where you can type plain or formatted text. This is your primary block for writing anything in Notion, from notes to detailed documents.
Notion goes beyond just text. It offers different kinds of elements to help you organize and make your content better. Here's what you can add:
- Headings, for organizing your information. They come in different sizes to help you set up your content in a clear way
- Bulleted List, for listing things without worrying about order
- Numbered List, for steps or instructions that need to go in a certain order
- To-Do List, to keep track of tasks and things you've done, with boxes you can check off
- Toggle List, to hide or show more information with just a click
- Quote, for highlighting quotes or important points
- Divider, to break up your content into sections, making it easier to read and look at
- Callout, to draw attention to specific notes, tips, or warnings, and you can change its icon and color
Media Blocks (Image, Video, Audio, Web Bookmark…)
When it comes to making your pages more engaging, media blocks are invaluable.
Media blocks really make using Notion better because they let you easily put different kinds of media like pictures, videos, audios, bookmarks, and even files from other places like Google Drive or Dropbox, right into your notes and pages.
You can simply drag and drop media into your pages or use a special ‘/’ command to pick the kind of media block you want to add.
.webp)
Images: Notion supports a variety of image formats, ensuring your visual content is seamlessly integrated into your workspace.
Videos: On your Notion page, you can also easily add videos from any streaming service or upload your own. Simply click the + or type /video, then either paste an embed link or upload a file directly.
Audio: The same steps apply to adding audio, with the option to type /audio and either embed or upload from your device. Both videos and audio will play in Notion's custom player if your browser or OS supports the format.

Embed Blocks (Maps, PDFs, Posts)
Notion's embed blocks heighten interactivity by allowing you to embed various contents directly into your pages. You can display specific locations with Google Maps, access your top Spotify playlists, or connect to important web pages.
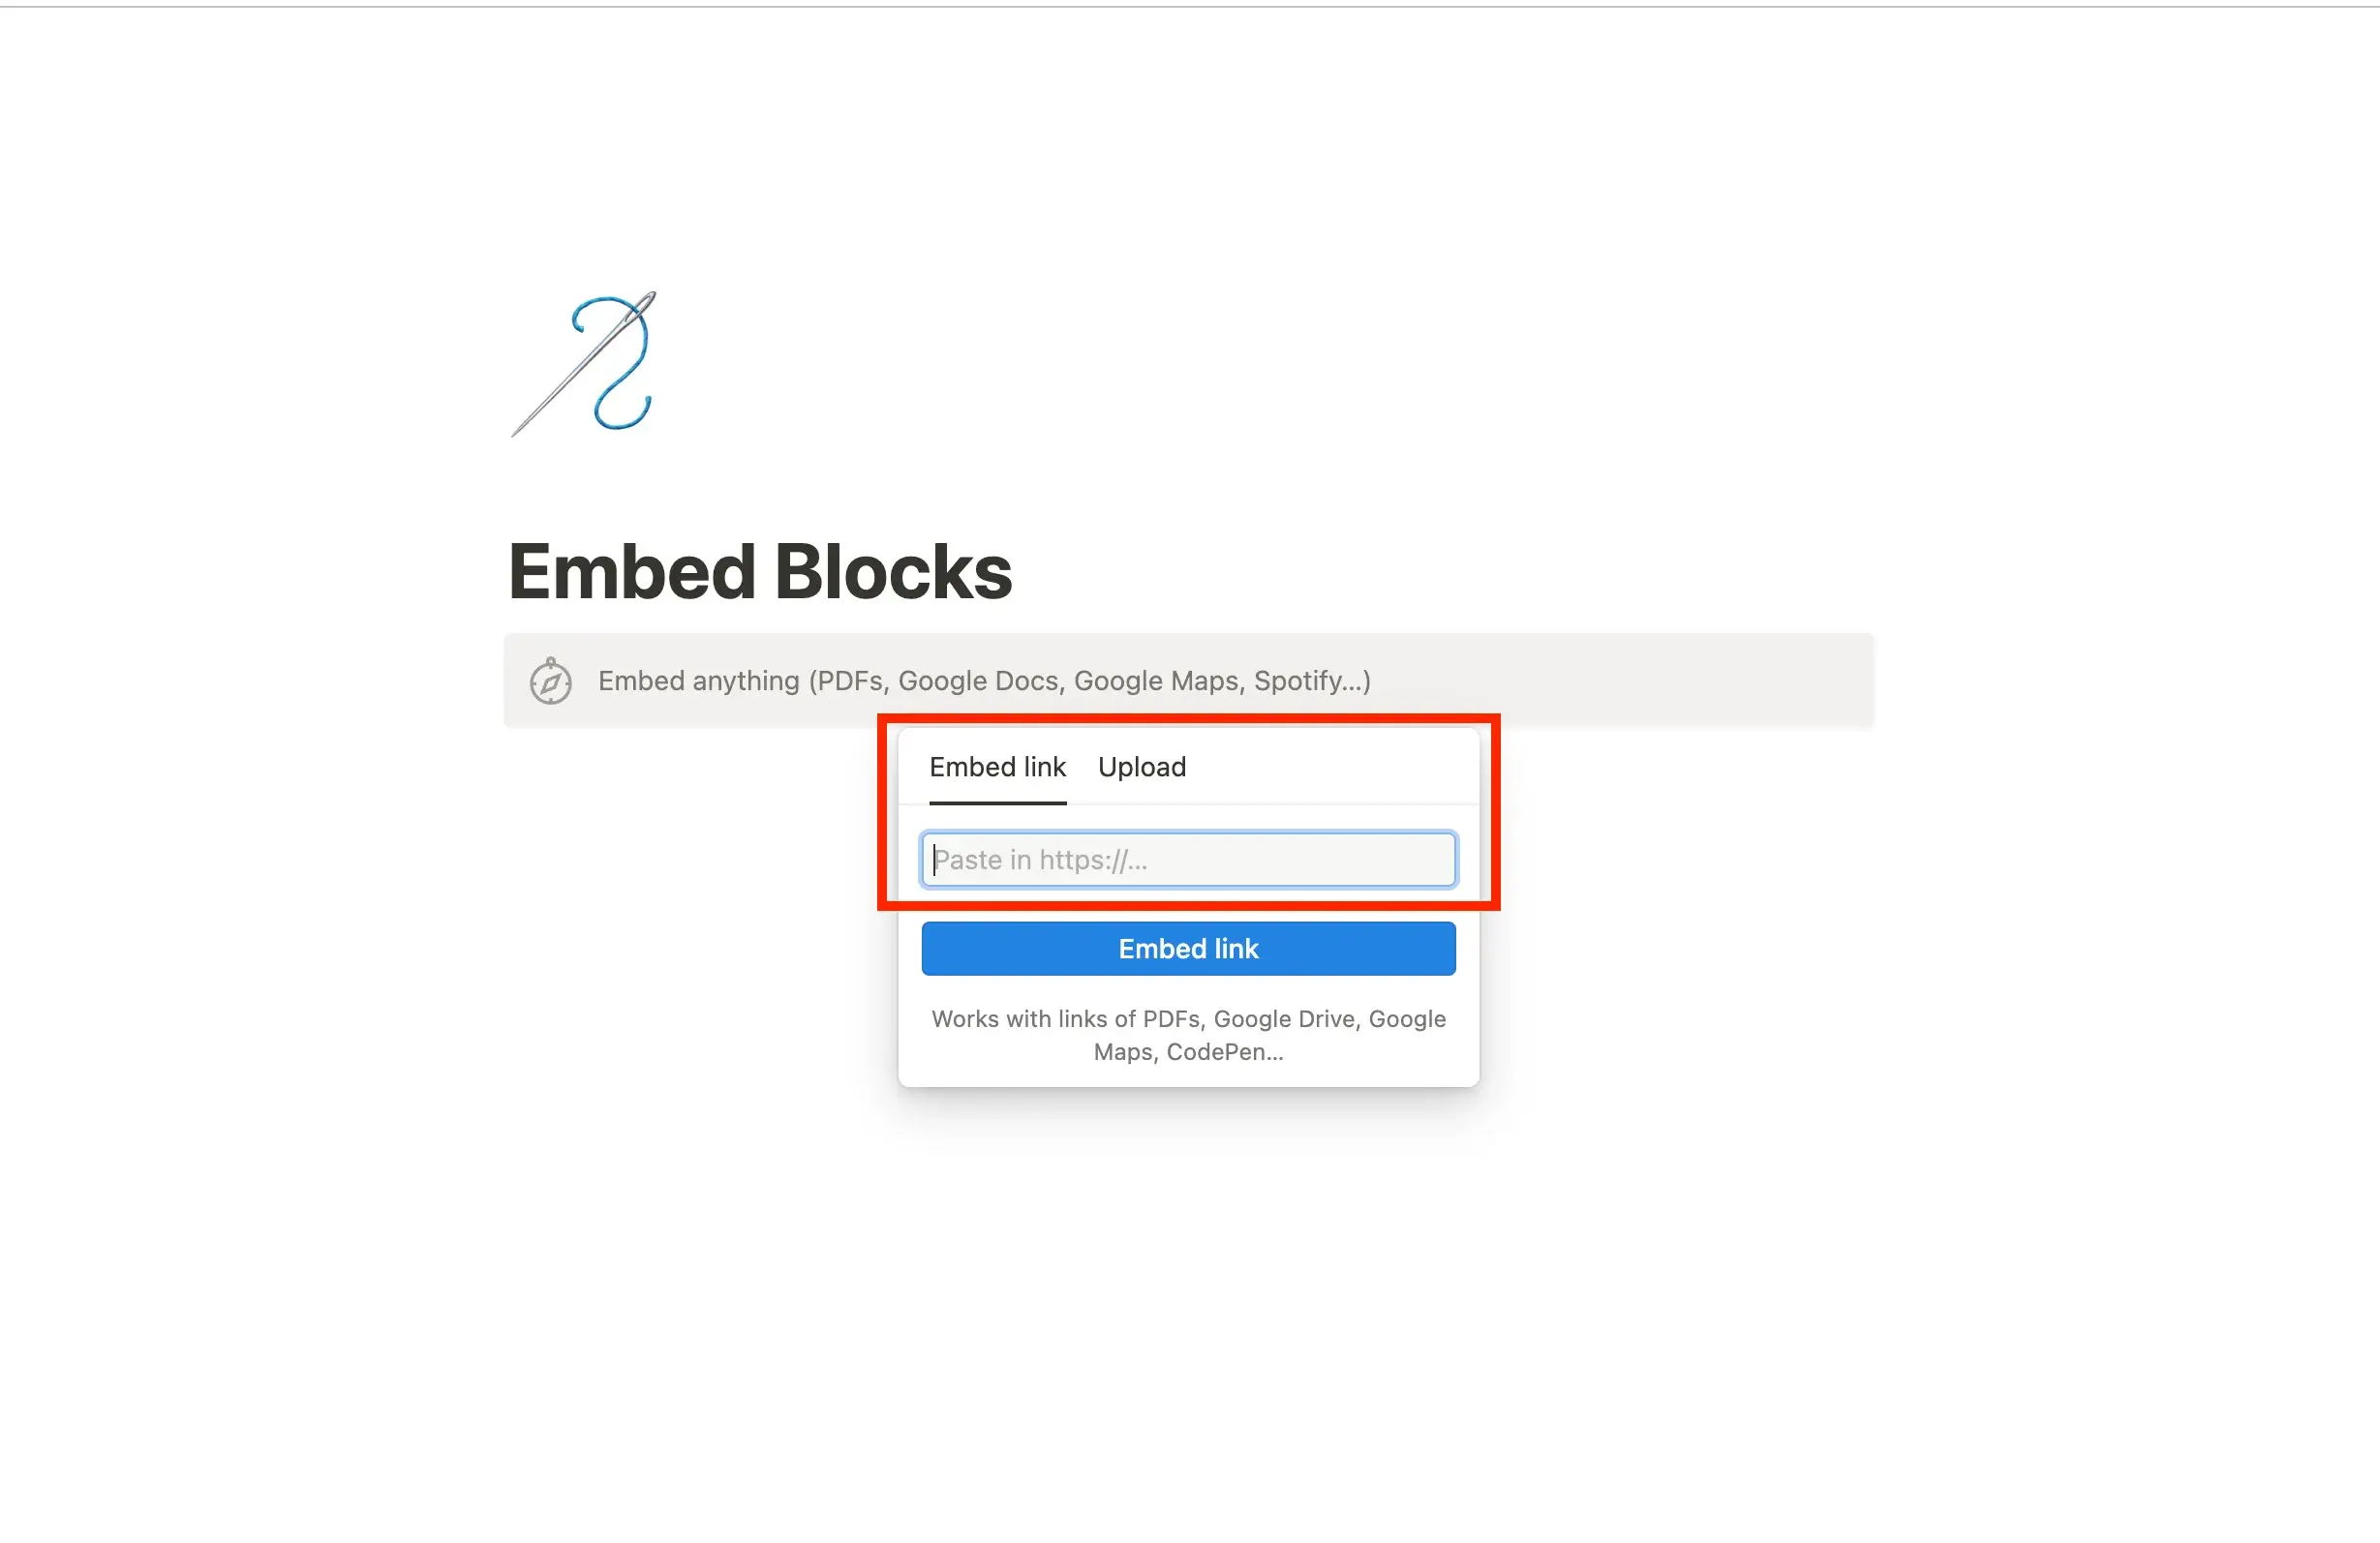
To insert embedded content, hover over a new line until you see a "+" on the left. Select "Embed" or opt for any directly listed common embed types. Hit "enter". Then, in the following menu, enter the URL or embedding link of your item of choice.
Alternatively, for uploading and displaying personal media such as images, audio, video, or documents, use "/embed". Click "Upload" and pick the desired file from your device.
Notion lets you embed content from over 1,900 sources, meaning you can add media like videos, slides, photos, audio, and code directly to your pages, keeping all your needed info in one place.
Although you can embed most web content, Notion also offers special blocks for common media types (like videos, images, PDFs) and certain apps (such as Loom, Miro, X - Twitter) through the "/" menu or the "+" button. For example, typing "/tweet" embeds a Tweet, and "/maps" adds a Google Map.
Supported file types in Notion include: HTML files, PDFs, Audio files, Videos, Images.
Customization & Styling
Page customization allows us to personalize Notion workspace and make it more convenient for our needs. Understanding the basics of page customization is crucial. In this regard, let's explore various aspects of page customization in the complete notion tutorial including width, fonts, covers, and more. We will also cover the style of text, colors, and columns in our discussion.
Customize Page (Width, Fonts, Icons, Covers)
Notion allows you to customize your pages to reflect your own style or your brand's appearance. Although the customization options are limited, they help you concentrate on what is important.
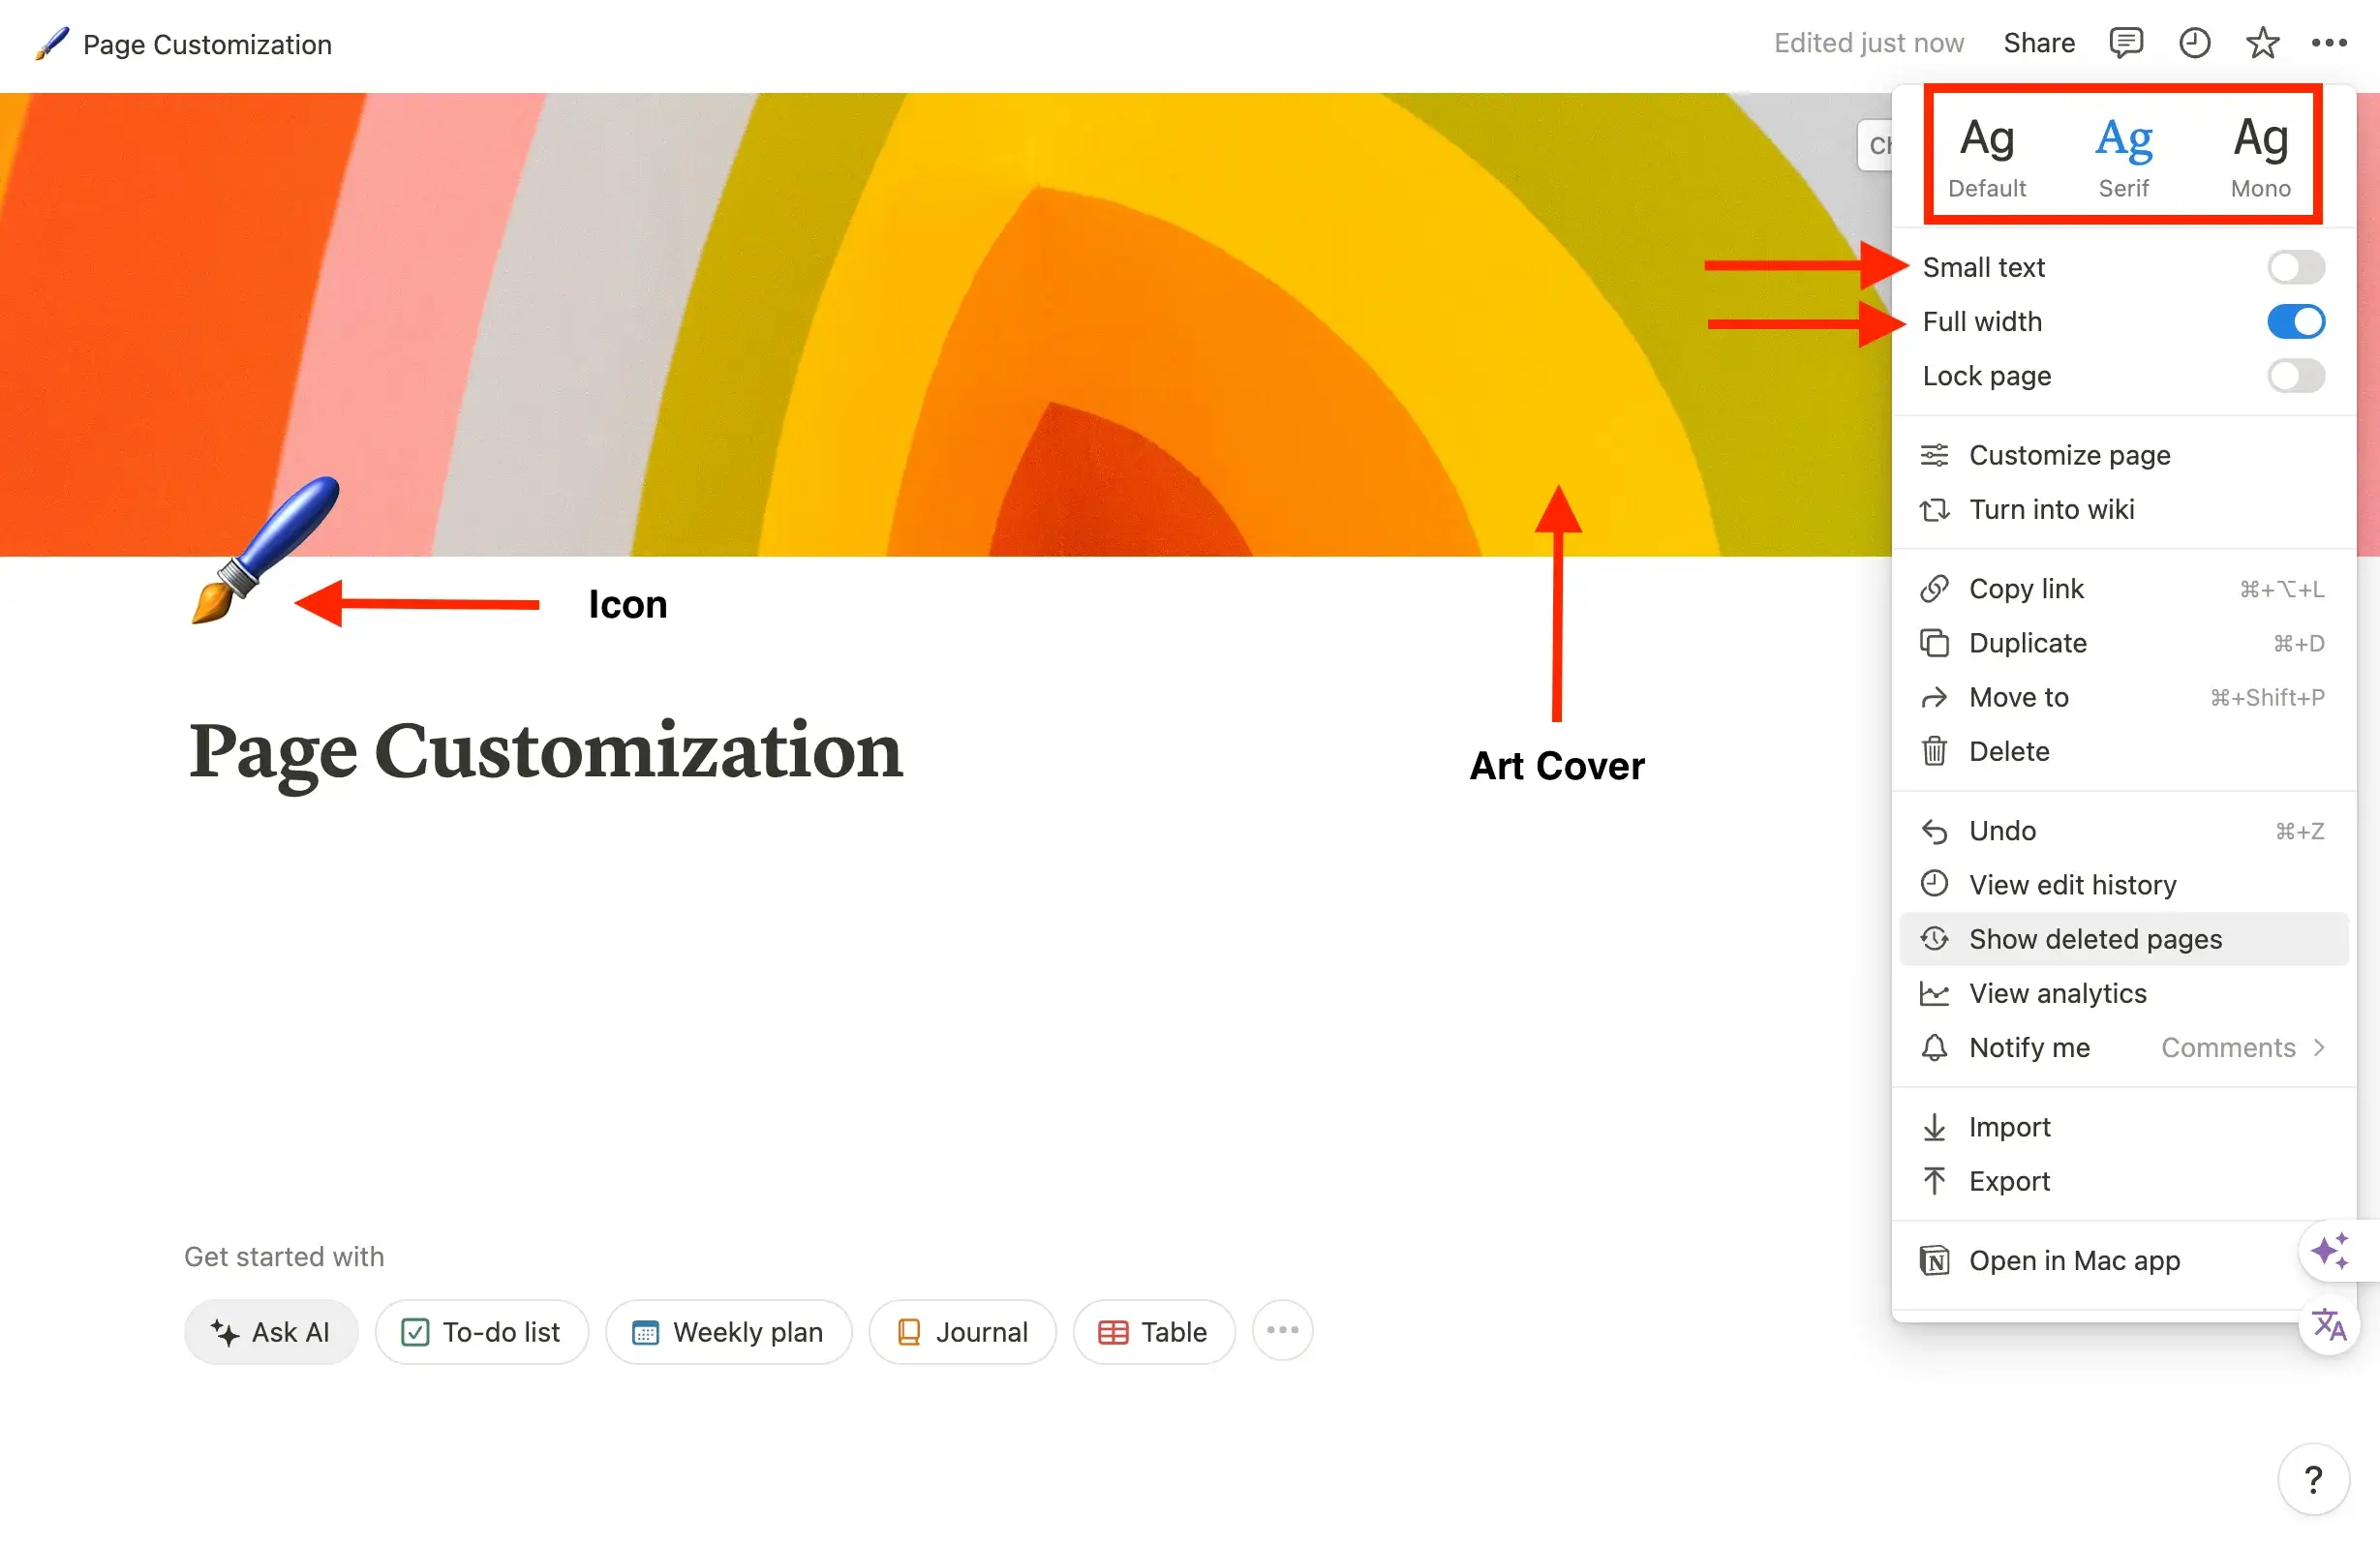
- Fonts: You can select from three typography styles for each page you create: Default, Serif, or Mono. To make the selection, click on the "•••" located at the top-right corner of your page. By selecting a style, all the text on your page will automatically change accordingly.
- Text size: You can adjust the text size on your page using the Small text toggle. To do so, click on the "•••" icon at the top-right corner of your page, and enable the Small text button. Once activated, the text on your page will reduce in size.
- Page width: You can make the page wider for a bigger view, and pick from three text styles — Default, Serif, or Mono — to match how you're feeling or your brand's vibe
- Page icon: Each page can have its own little icon, like a fun emoji or a special image such as your logo. This makes your Notion pages look nicer and easier to find your way around.
- Page cover: Put cover art on any page, which makes the top of the page look really good. You have the choice to upload your own pictures or pick from a huge collection on Unsplash.
Style Page Content (Text Styling, Colors, Columns)
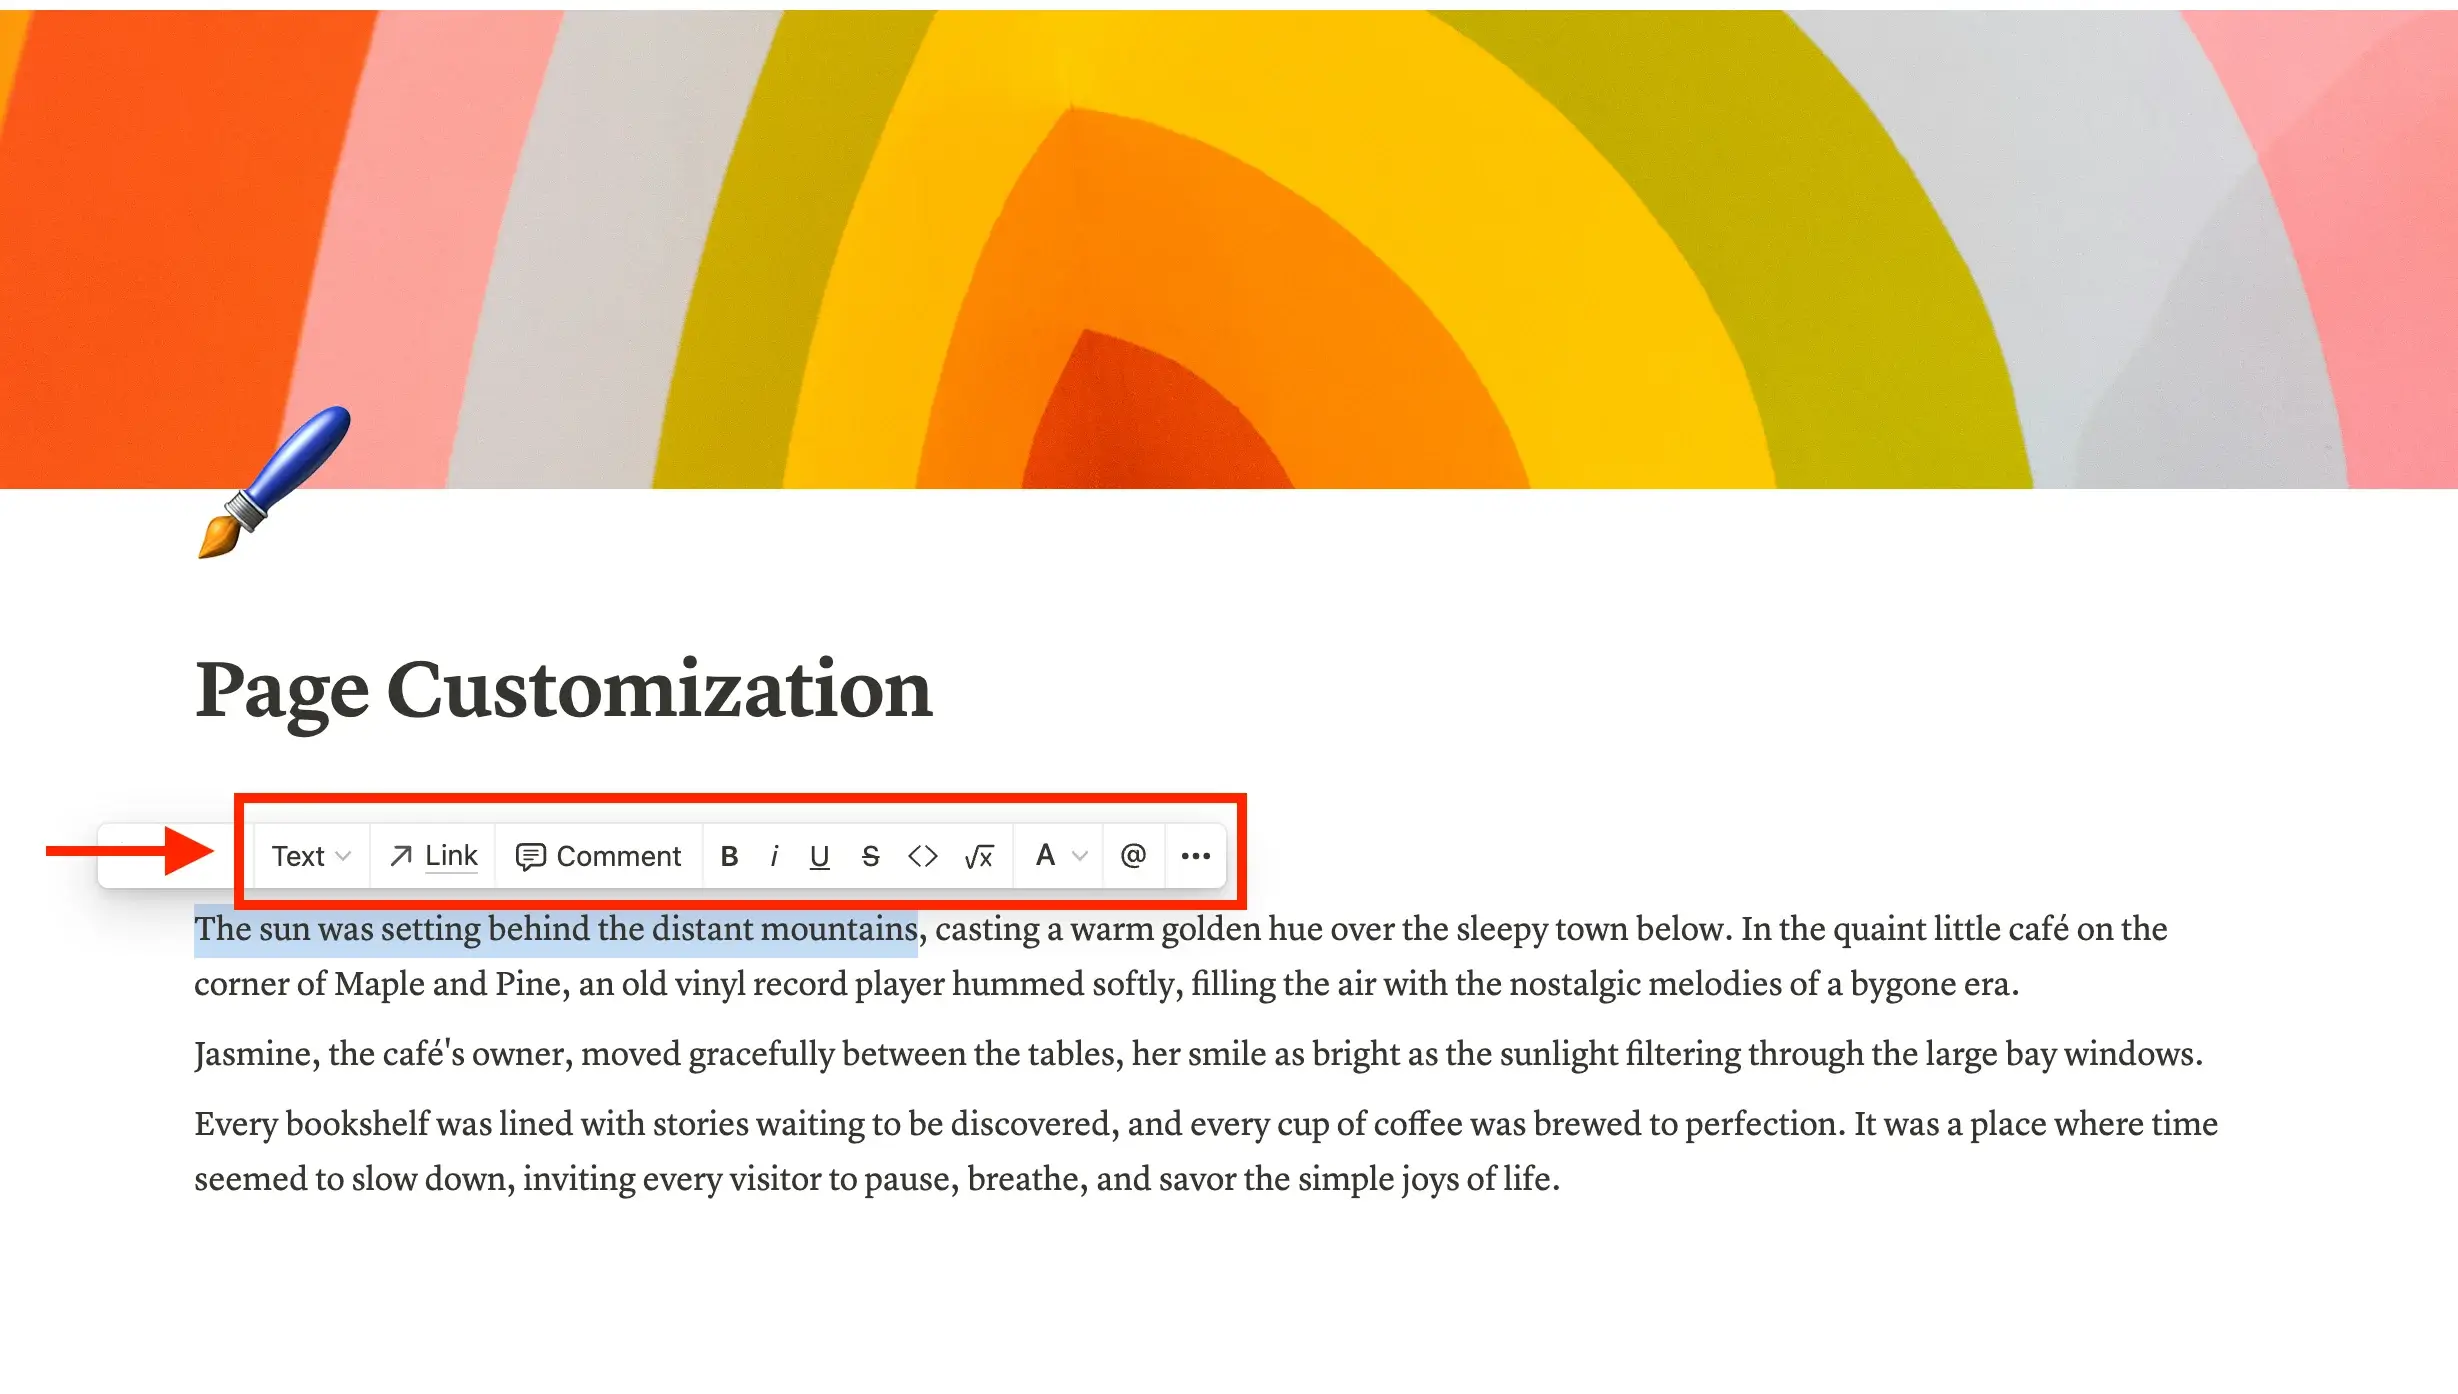
You can quickly make your text look nice in Notion using simple markdown tricks or the visual editing bar. This lets you quickly change your text to be bold, italic, have a line through it, or appear as code.
Text styling: Common shortcuts like cmd/ctrl + B for bold and cmd/ctrl + shift + S for strikethrough still work.
When you select a portion of text in Notion, you will see some options for styling. Additionally, you can mention a specific page or person in your Notion workspace by using the "@" symbol.
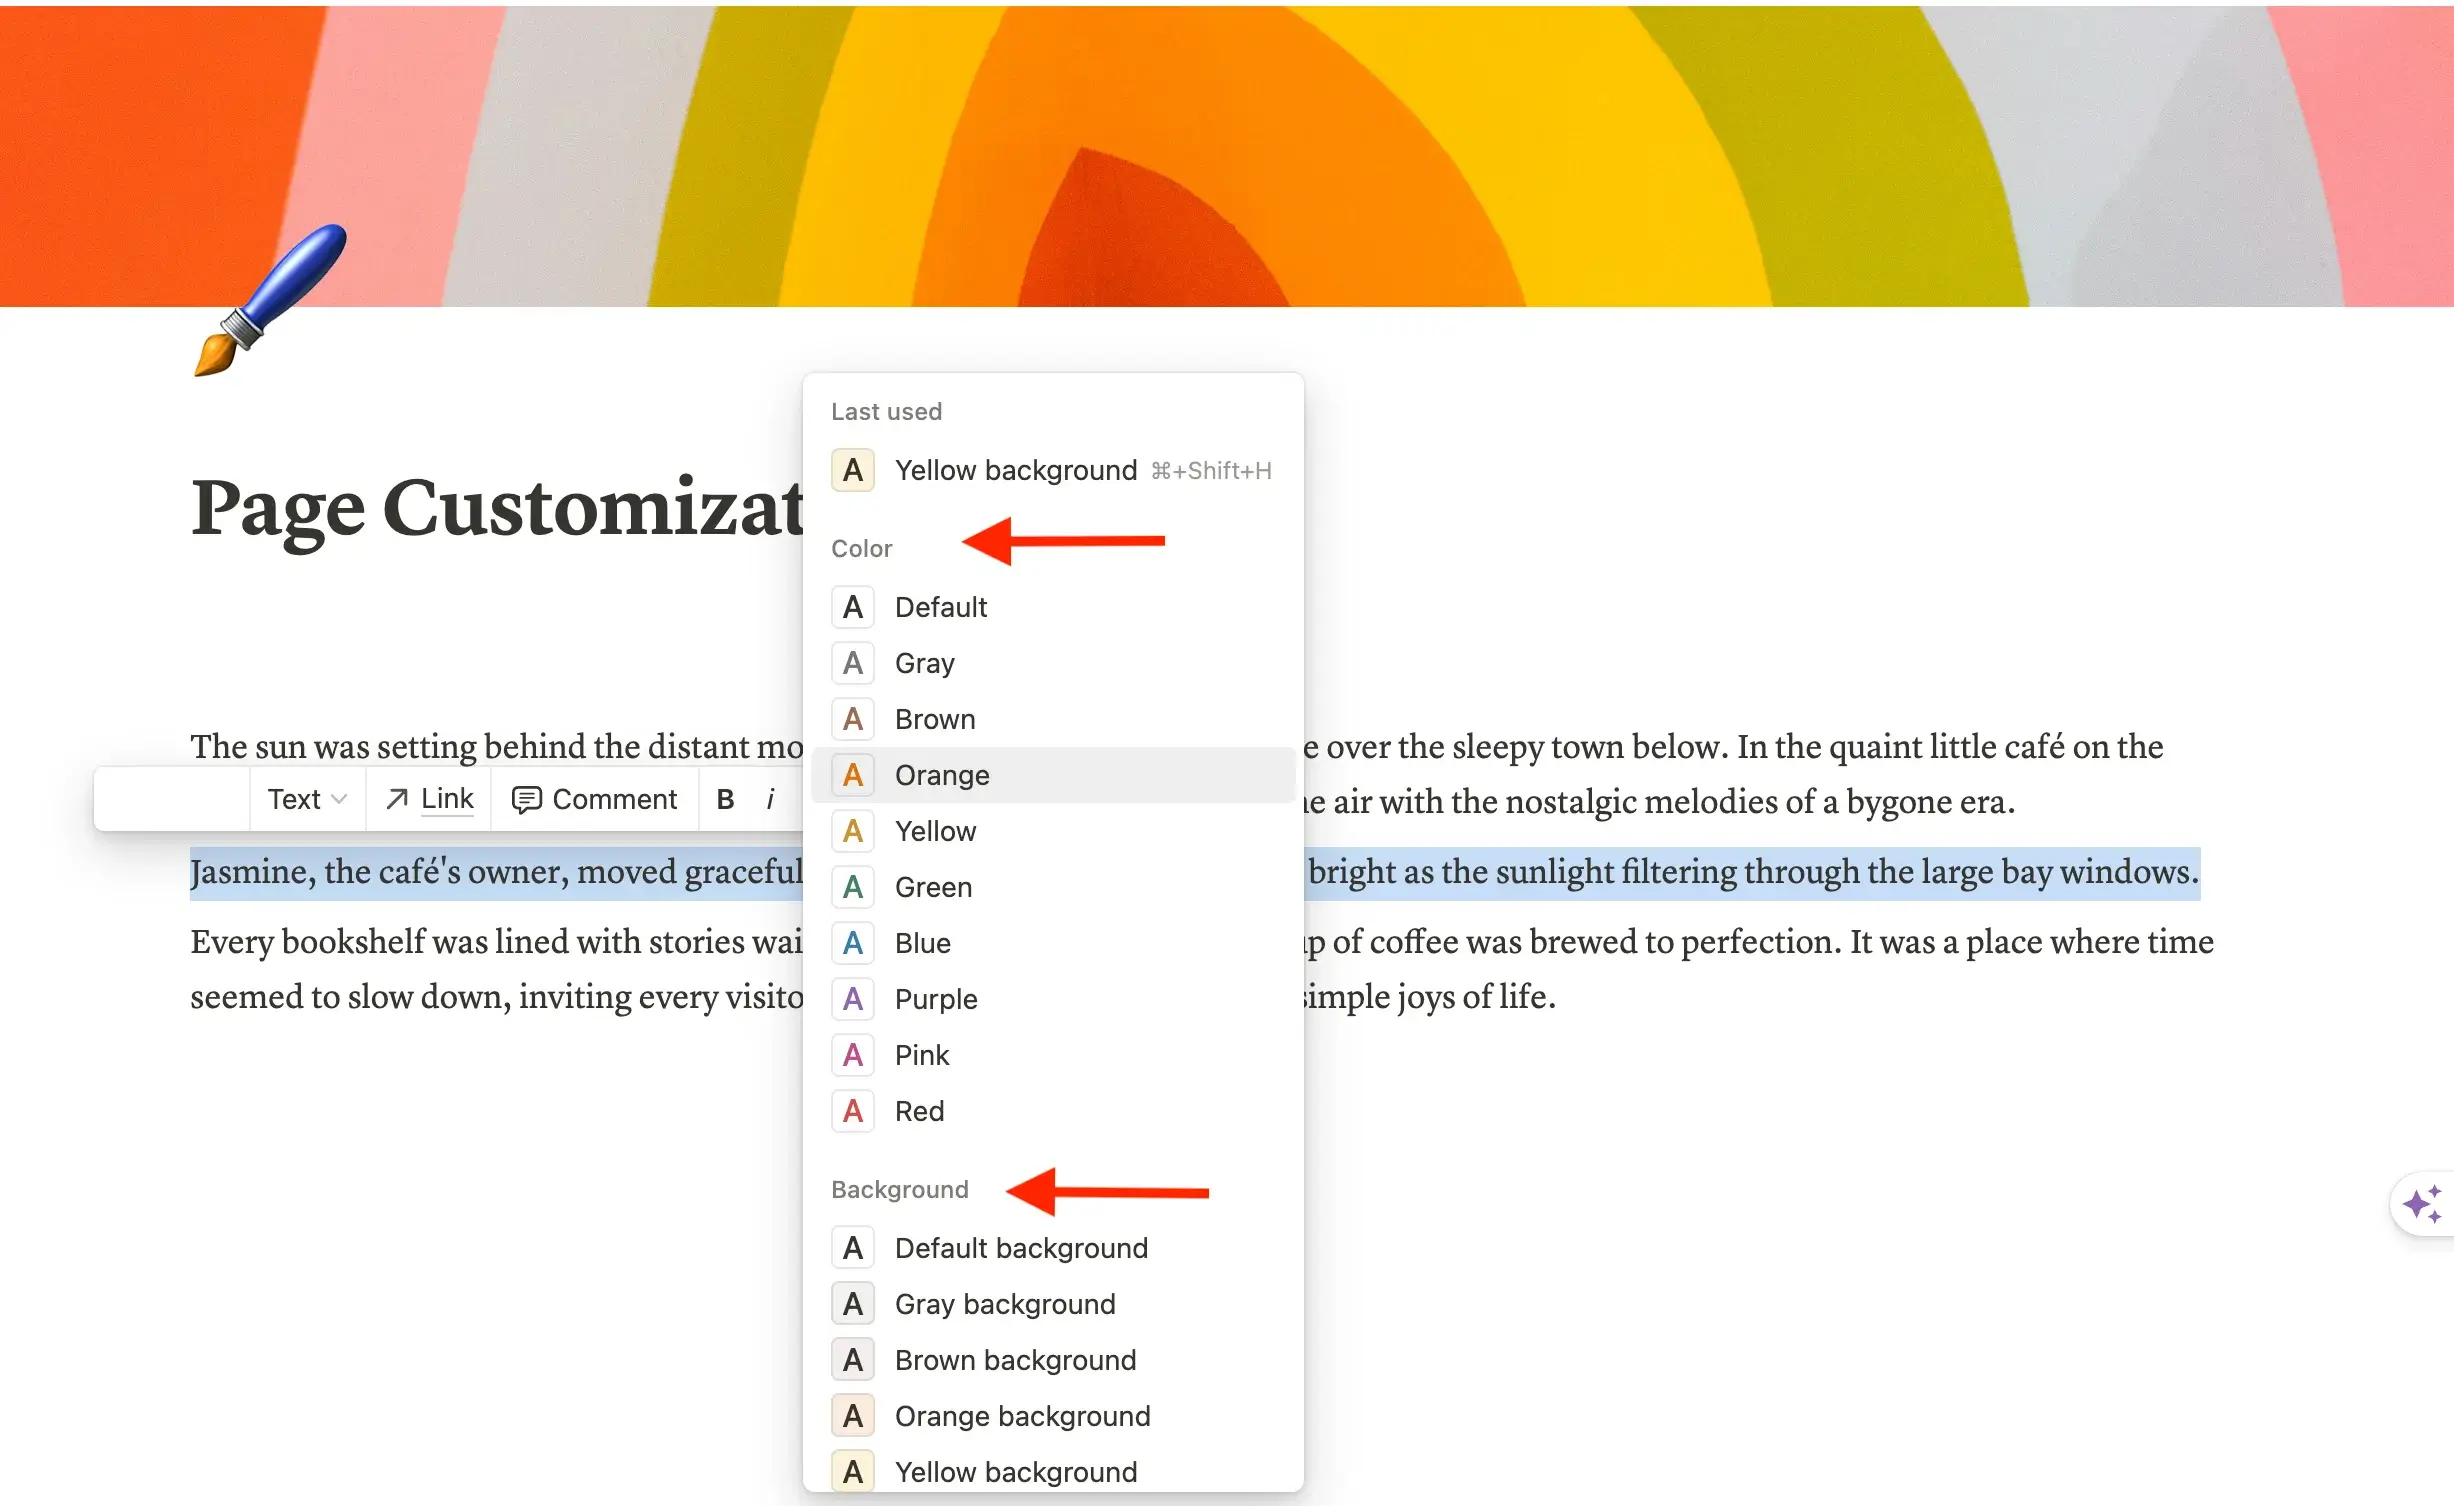
Colors: You can enhance text with a splash of color for both text and backgrounds. To color or highlight text, use the A menu where you also find bold and italic options. Just select the text and pick a color.
To color a whole text block, type / and the color, like /red. Alternatively, press cmd/ctrl + / and enter the color name.
Columns: Sometimes it's useful to place information side by side. To do this, make columns by dragging and dropping the text where you want it, using the ⋮⋮ symbol to move it.
Follow the blue guides to position it, creating a column. You can make multiple columns on a page. Adjust column sizes by dragging the gray lines at their edges.
Remember, columns work on tablets but not phones—on mobile, the right column's content will move under the left's.

Databases (Organized Pages)
Databases is a powerful instrument for managing and organizing various types of data in the Notion app. They offer customizable properties such as text, numbers, and dates, which enable users to add context and enhance data filtering, sorting, and searching capabilities.
Additionally, users can leverage features such as notion formulas, relations, rollups, and tags to perform calculations, connect and create databases, aggregate data, and tag team members.
The flexibility and functionality of Notion databases make them a valuable asset for data management and organization. Very different from text-oriented tables found in Google Docs and Word document.
Database Properties (Data Types)
Notion databases can manage and organize different types of data with customizable properties. These properties help add context, making it easier to filter, sort, and search your data.
Properties and their uses include:
- Text: Formatted text for summaries or notes
- Number: Can be formatted for various purposes like tracking prices
- Status: Progress or state of items, tasks, or projects for clarity and structure
- Select and Multi-Select: For categorization, allowing one or multiple choices
- Date: For deadlines, with options for ranges and times
- Person: Tagging team members
- File: Uploading documents and images
- Checkbox: Simple task tracking
- URL, Email, and Phone: For adding contact details
- Created time/by and Last edited time/by: Auto-recorded timestamps and user details
- Button: Automates workflows with actions on database pages
- Formula, Relation, and Rollup: For calculations, connecting databases, and aggregating data
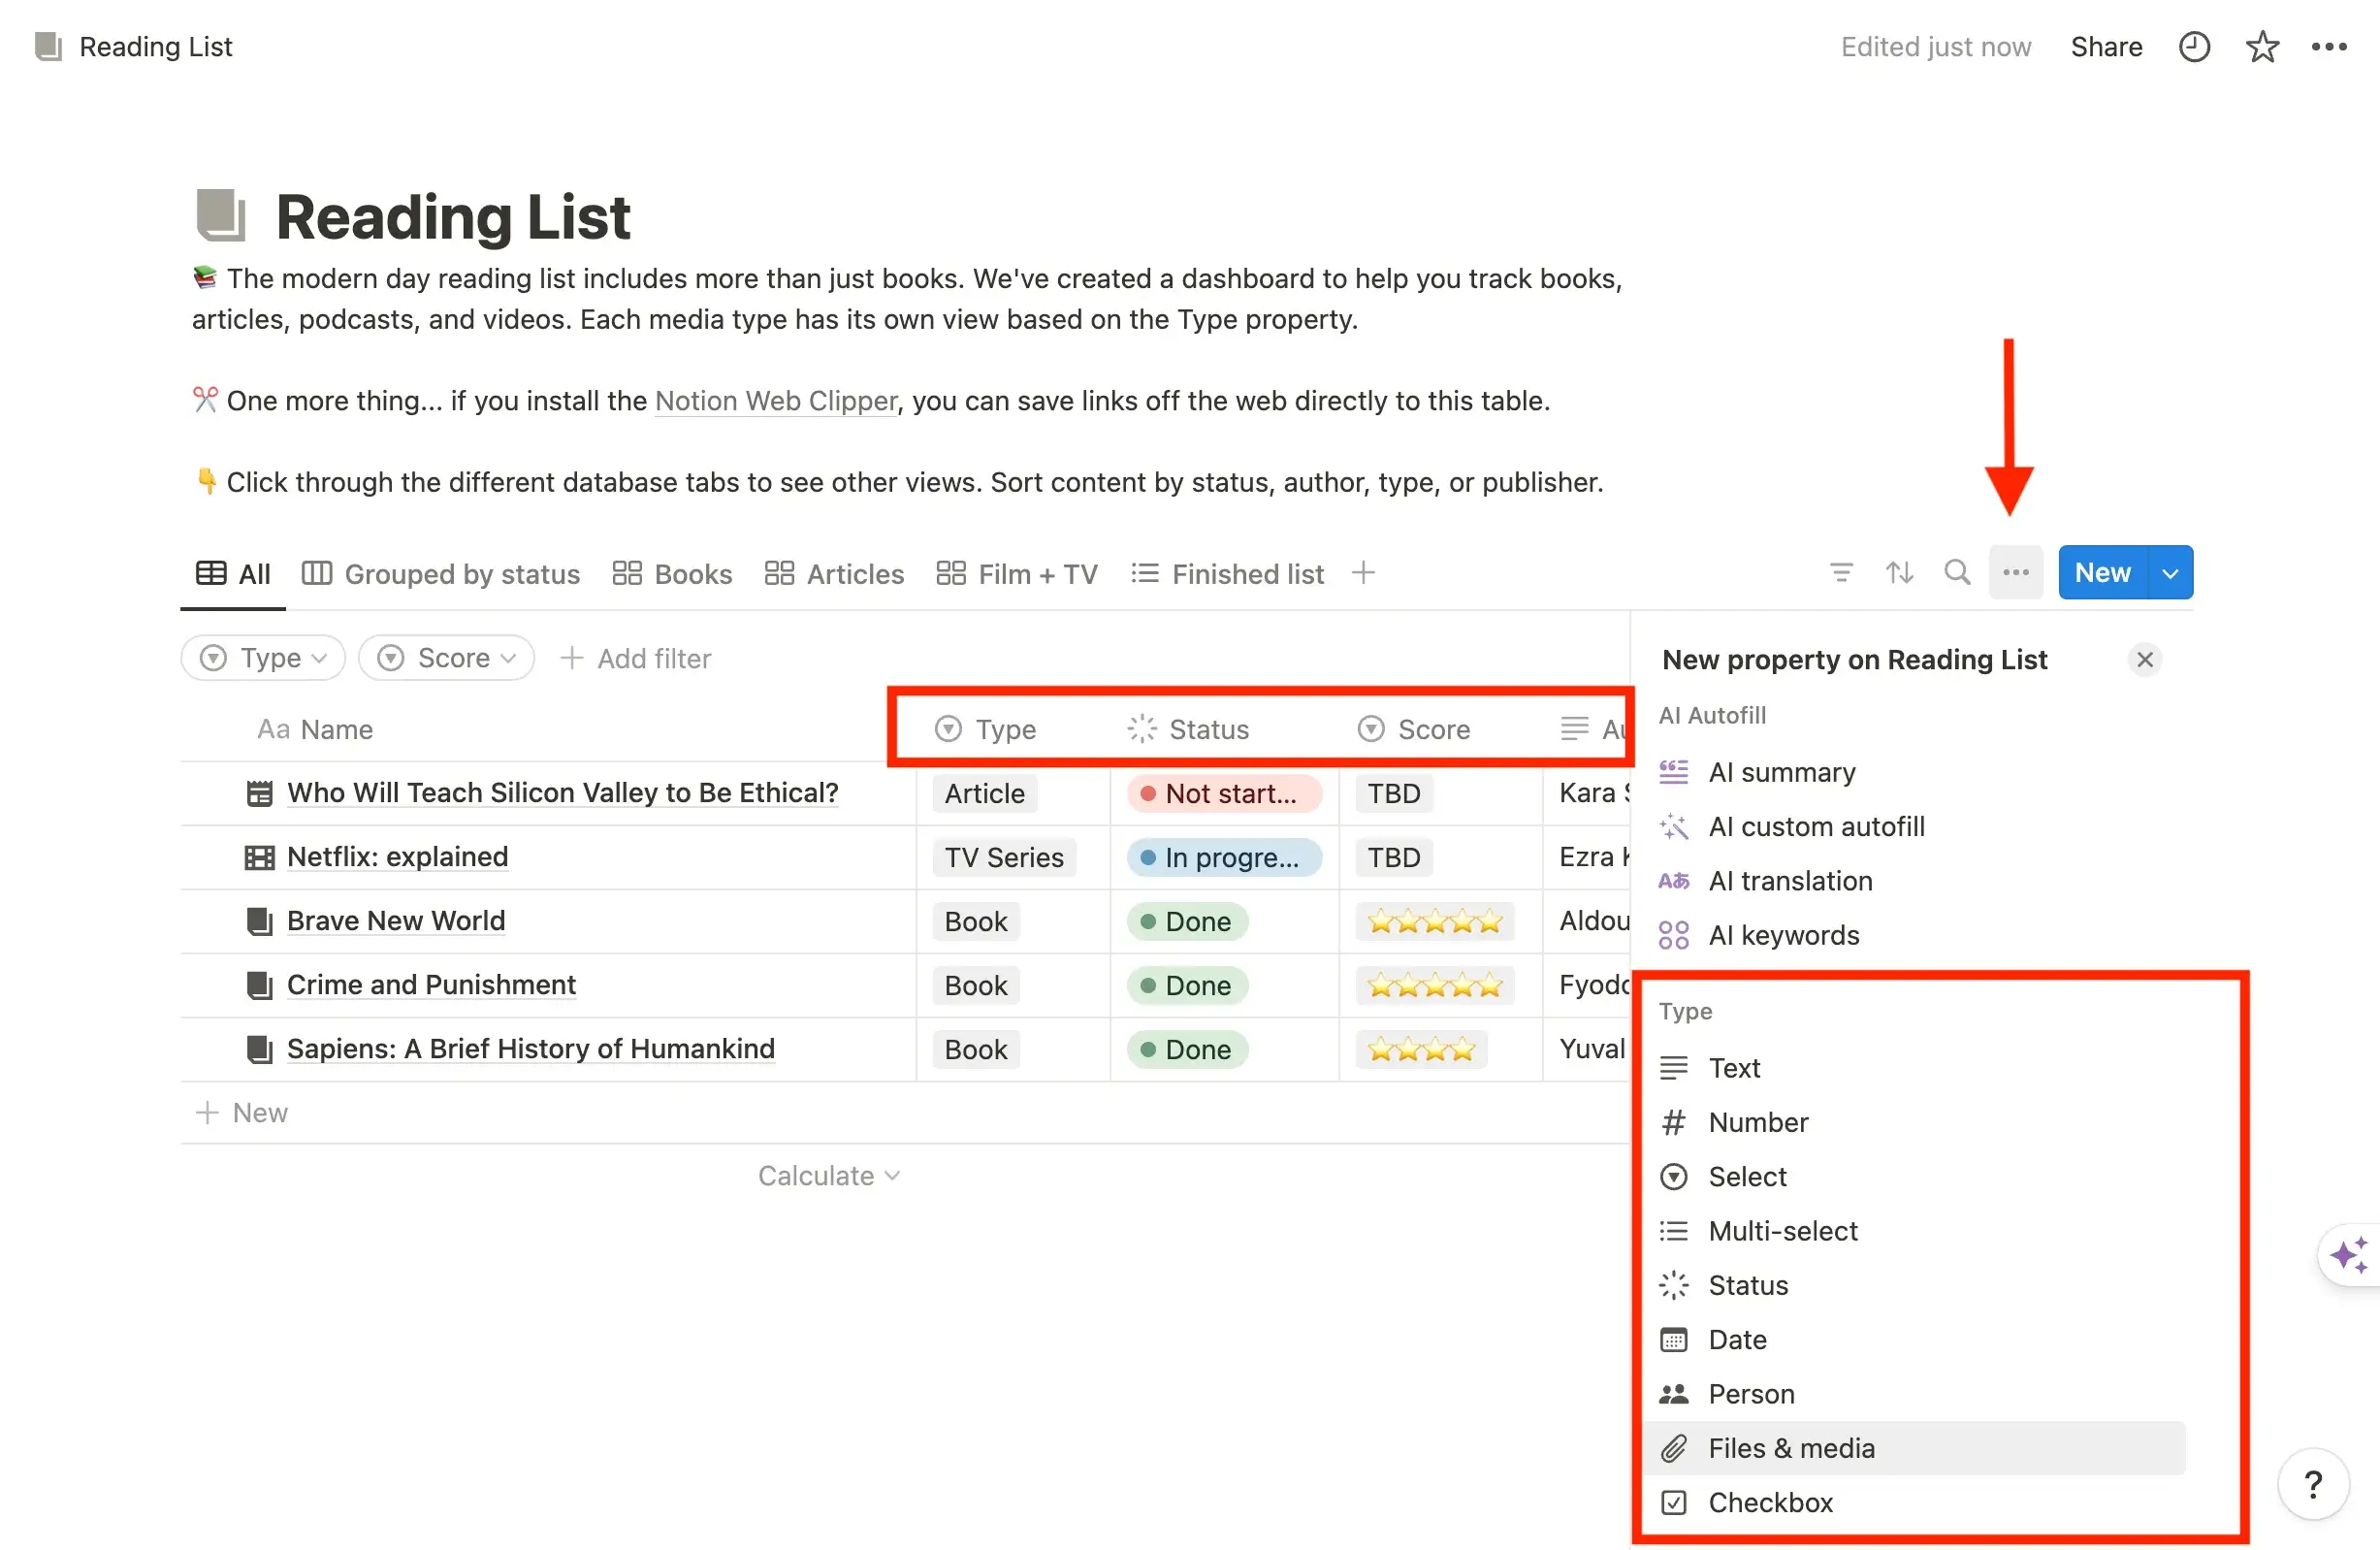
To manage properties, you can add, hide, edit, or rearrange them as you like.
Database Views & Layouts
You can see a database in many ways and change views based on your needs, using filters and sorts to organize content.
Database views: You can change the default database view and create more by clicking on + next to current views.
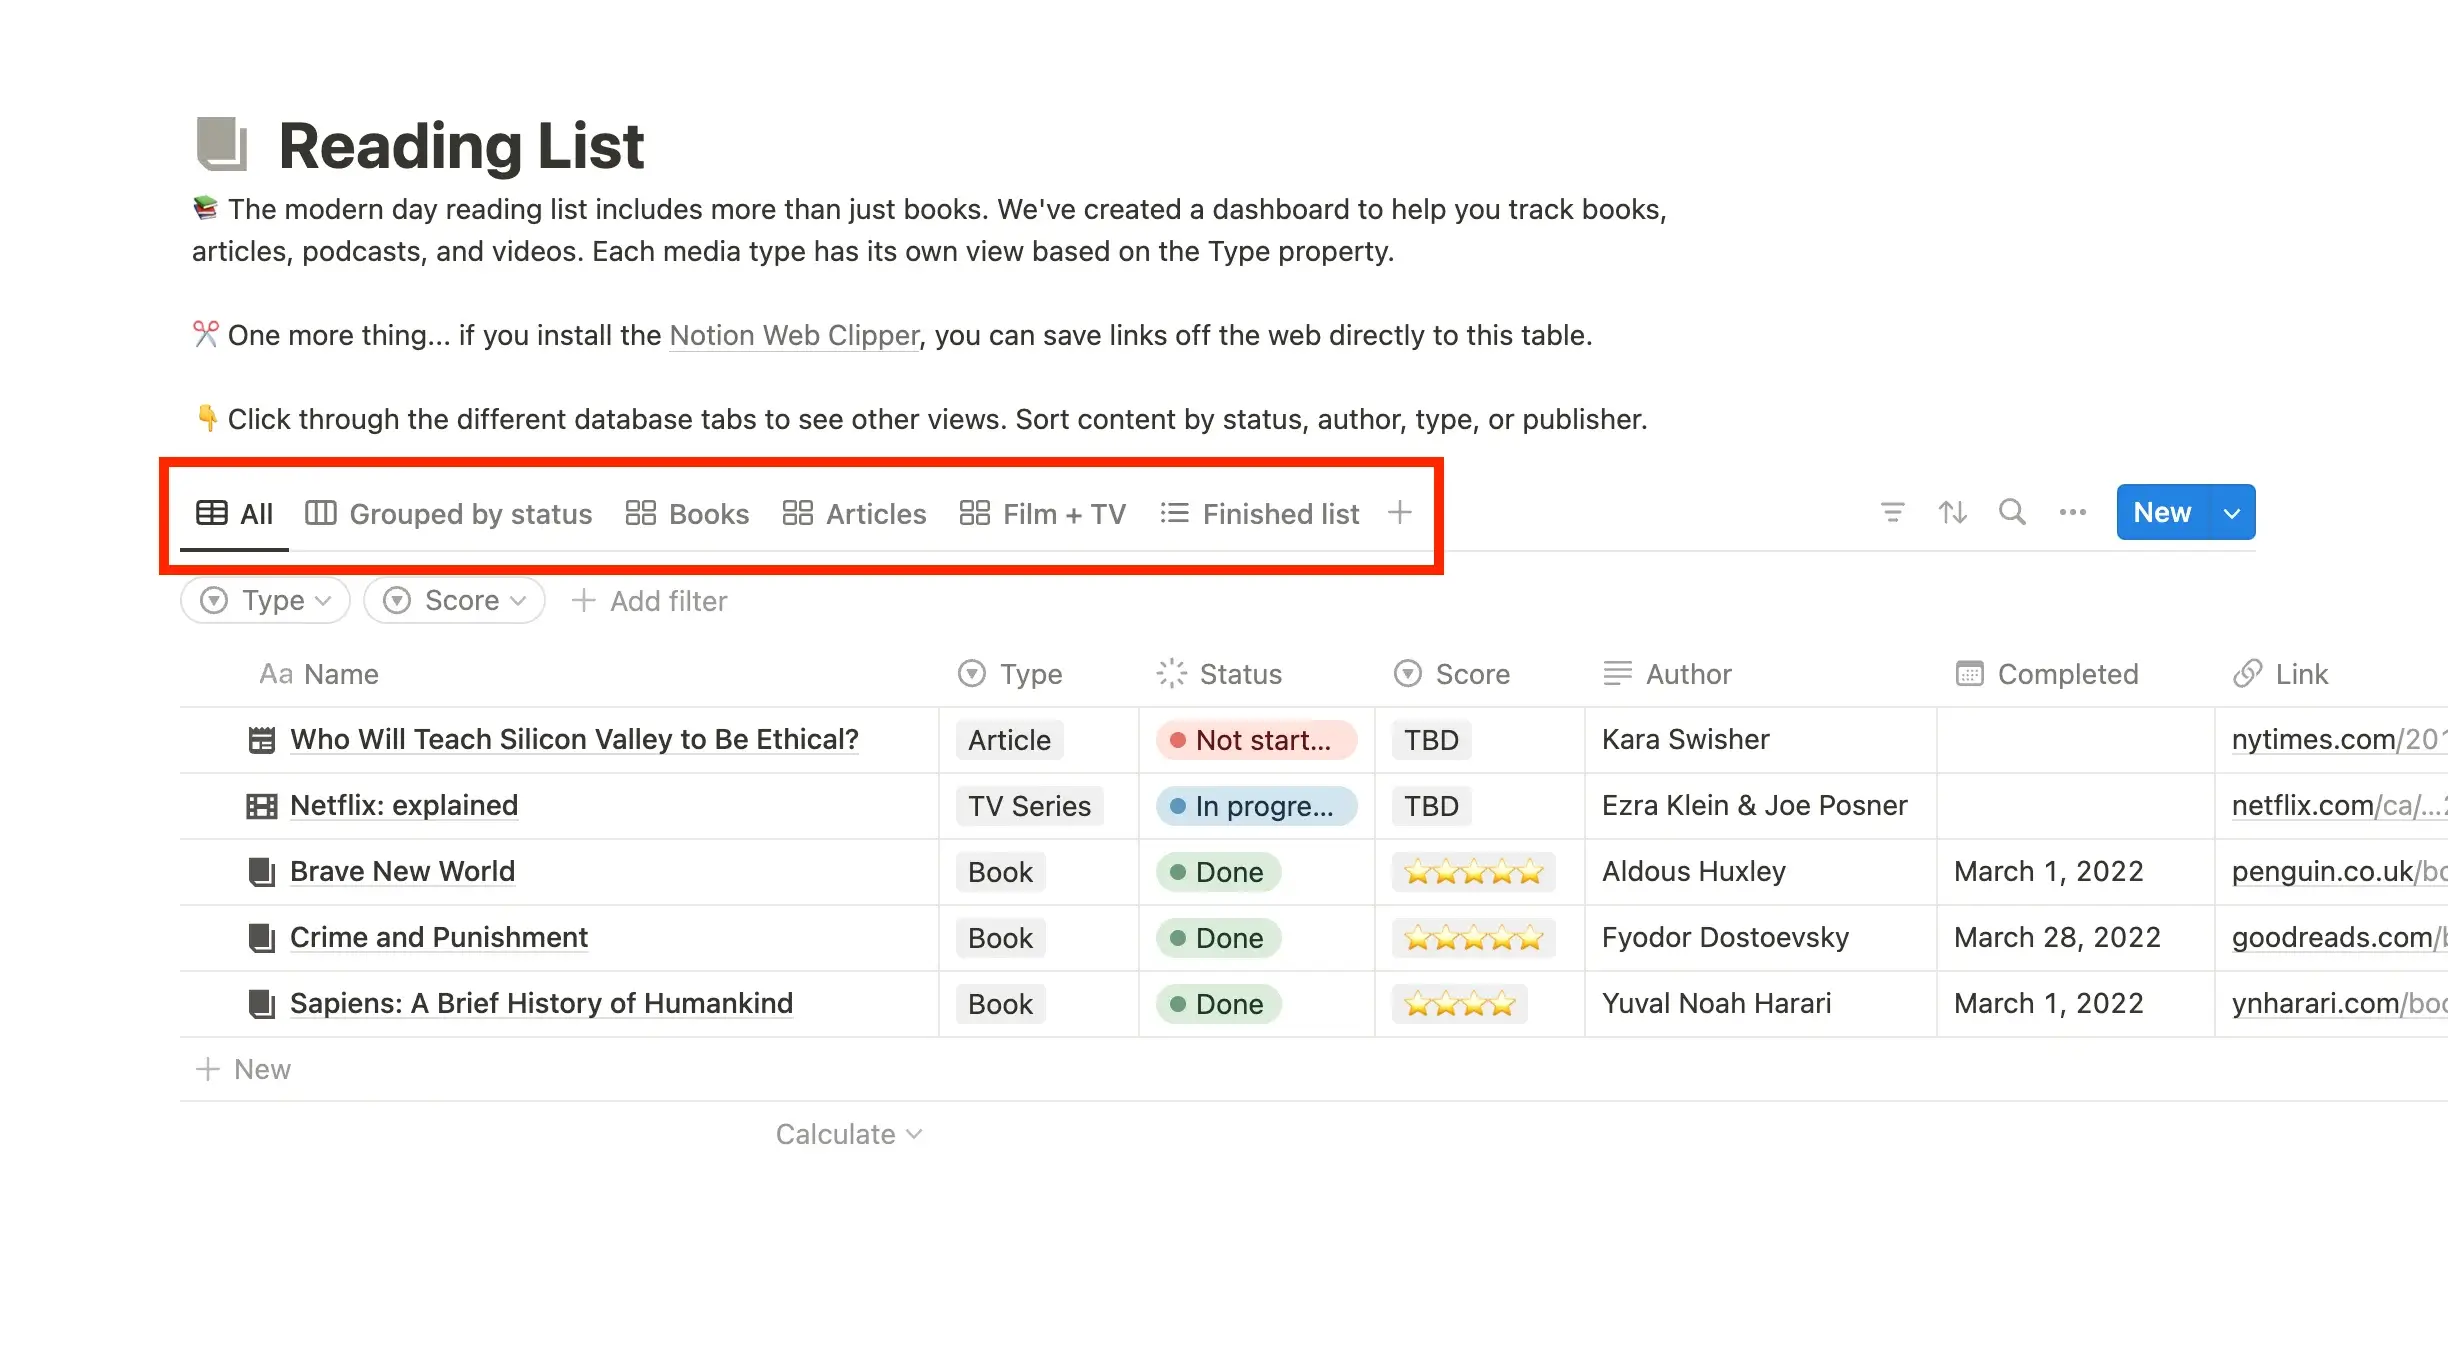
In the sidebar, views are nested under a database page, indicated by a • to the left. Click any view in the sidebar to access it quickly.
Database layouts: You can show your content in six different ways inside a database:
- Table shows data as rows and columns
- Board groups items by properties, useful as a Kanban board
- Timeline plots projects over time like a Gantt chart
- Calendar shows items by their Date property
- List provides a minimal, vertical list of items
- Gallery displays images from the Files & media property or content inside pages
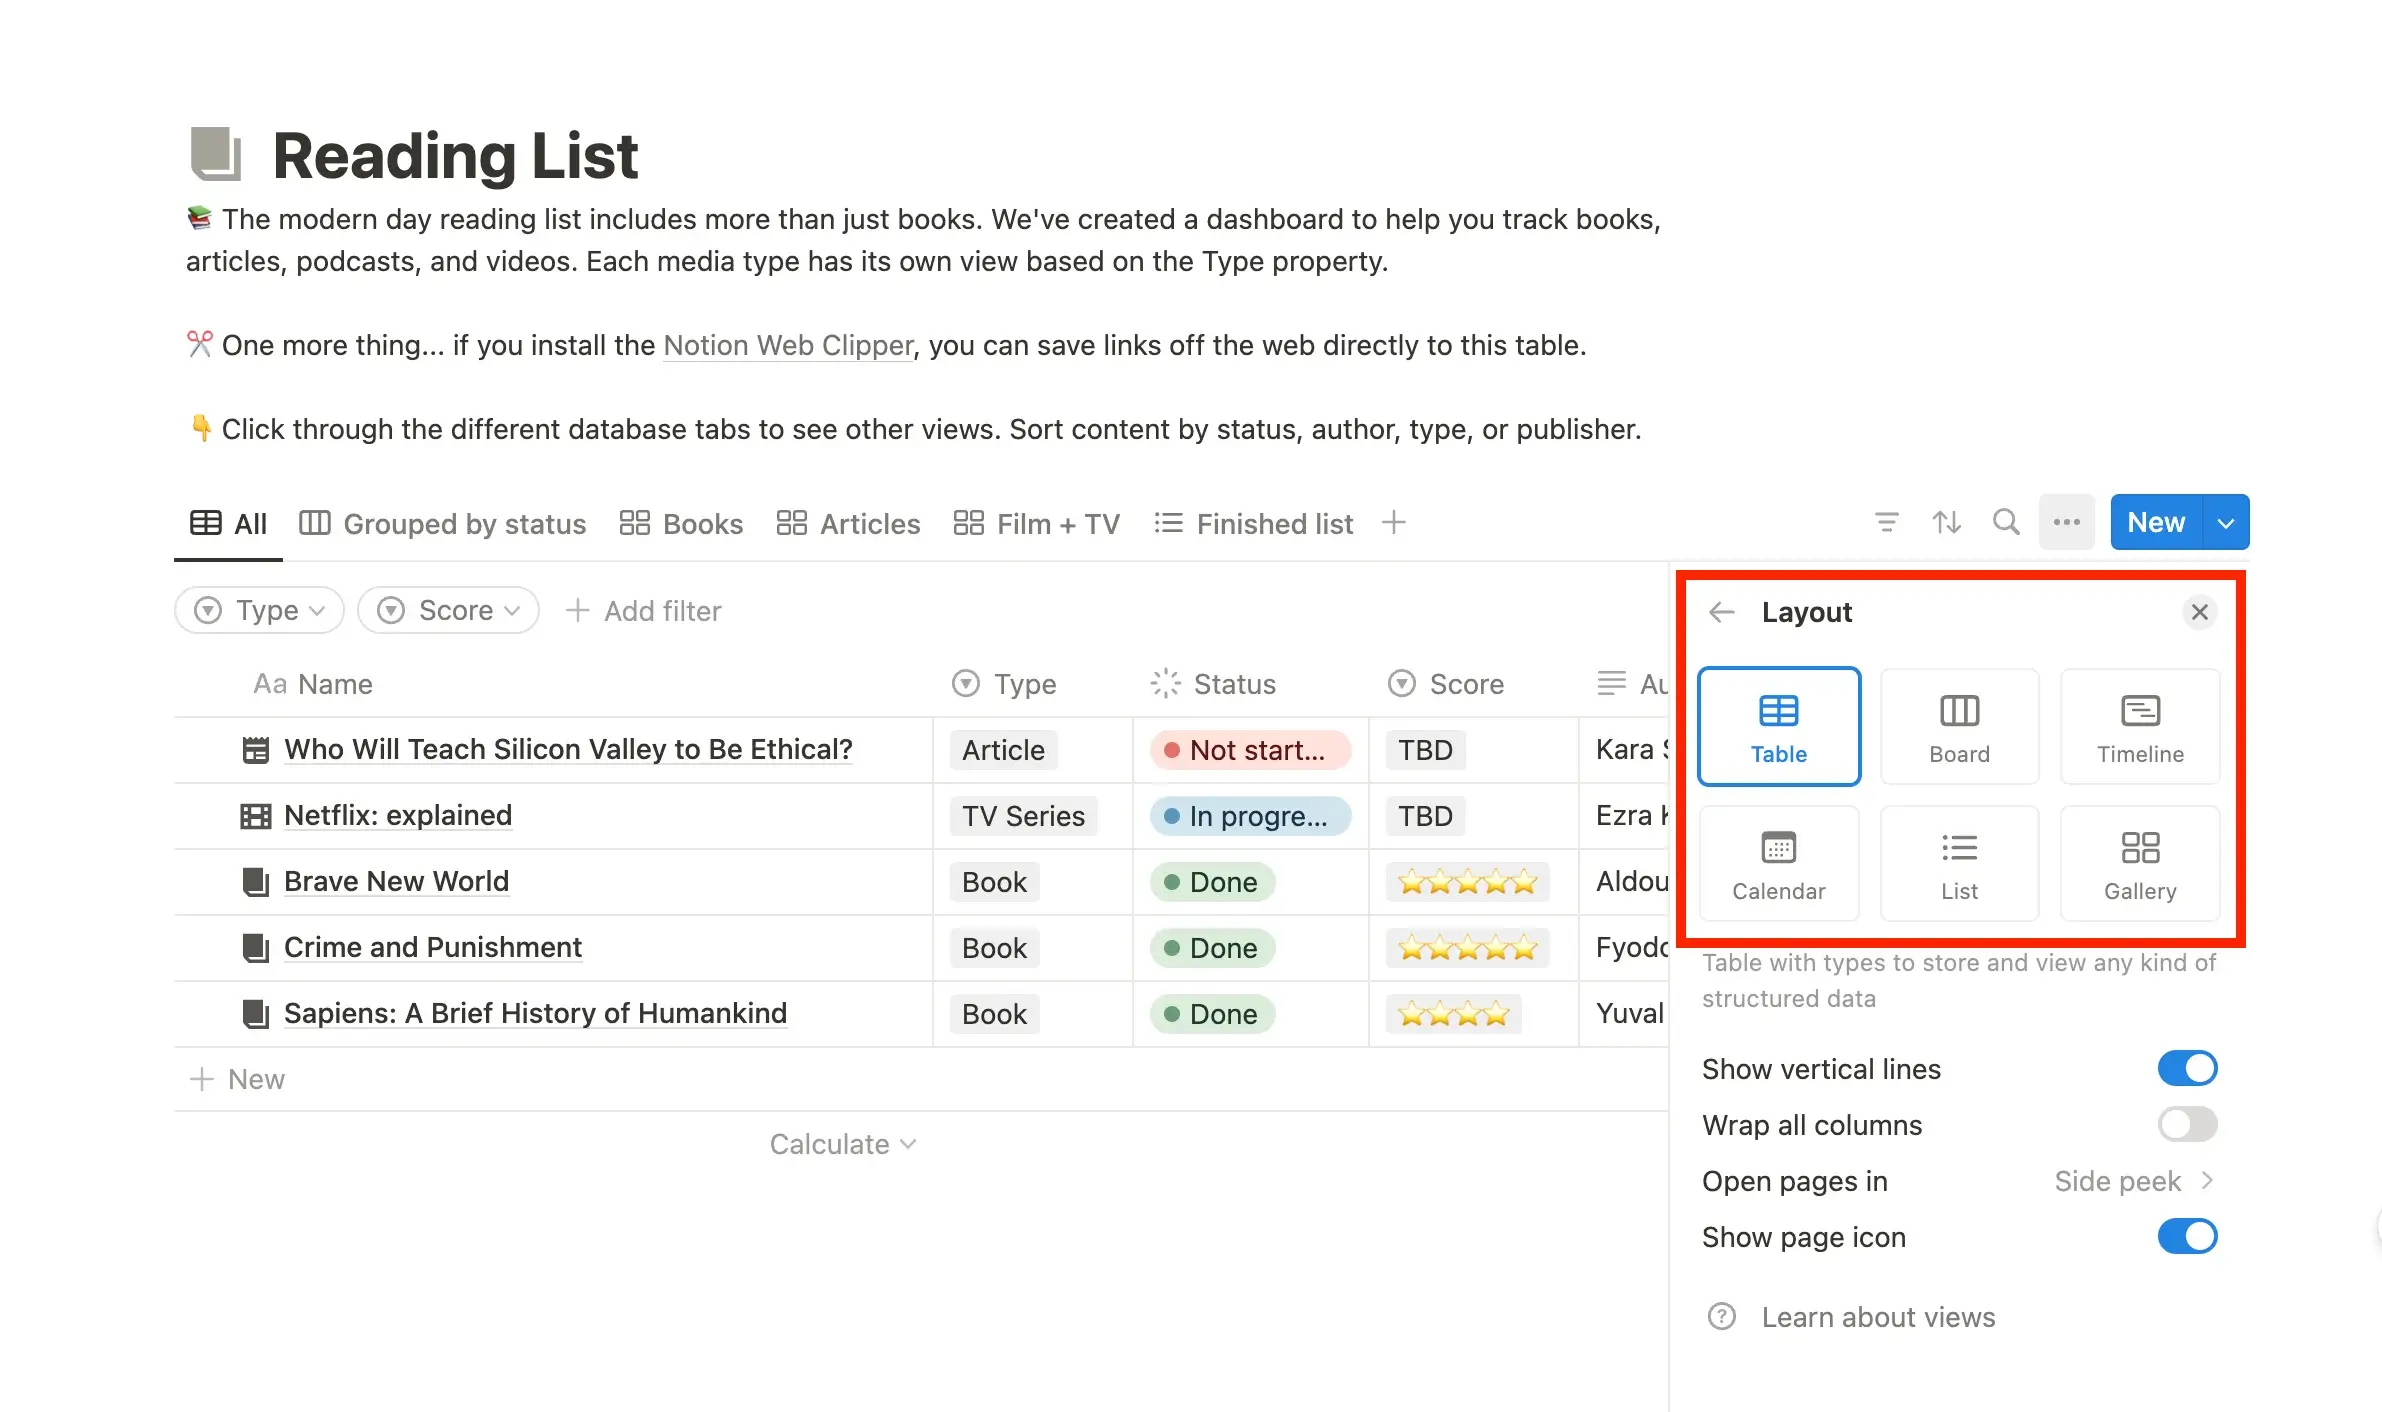
To customize views, click the view’s name to rename, duplicate, delete, copy its link, or modify its elements.
Customize components including layout, properties visibility, filters, sorts, and grouping by clicking on ••• at the top right of the database.
Database Filters and Sorts
Notion offers versatile filtering options for your database, allowing you to display specific items based on desired criteria. Filters can range from simple to complex.
To add filters:
- Click "Filter" at the top of your database
- Select the property you want to filter by from the dropdown menu
- The filter will appear at the top of your database. Click the filter icon to view and edit applied filters
- To add another filter, click the filter icon and choose "Add filter." You can have multiple filters
You can also sort your database items by properties, arranging them in ascending or descending order. This allows for prioritizing, based on edits or alphabetization.

To sort database entries:
- Click "⇅" at the top of your database
- Choose the property you want to sort by from the dropdown
- The sort appears at the top of your database. Click to edit
- Add or remove sorts using the "+" and "x" icons respectively
- Change the order of applied sorts by dragging them using the "⋮⋮" handle
Remember that different property types have varying sorting logic. Text properties sort alphabetically, number properties sort numerically, and for Select/Multi-select properties, you define the sorting order by rearranging options.
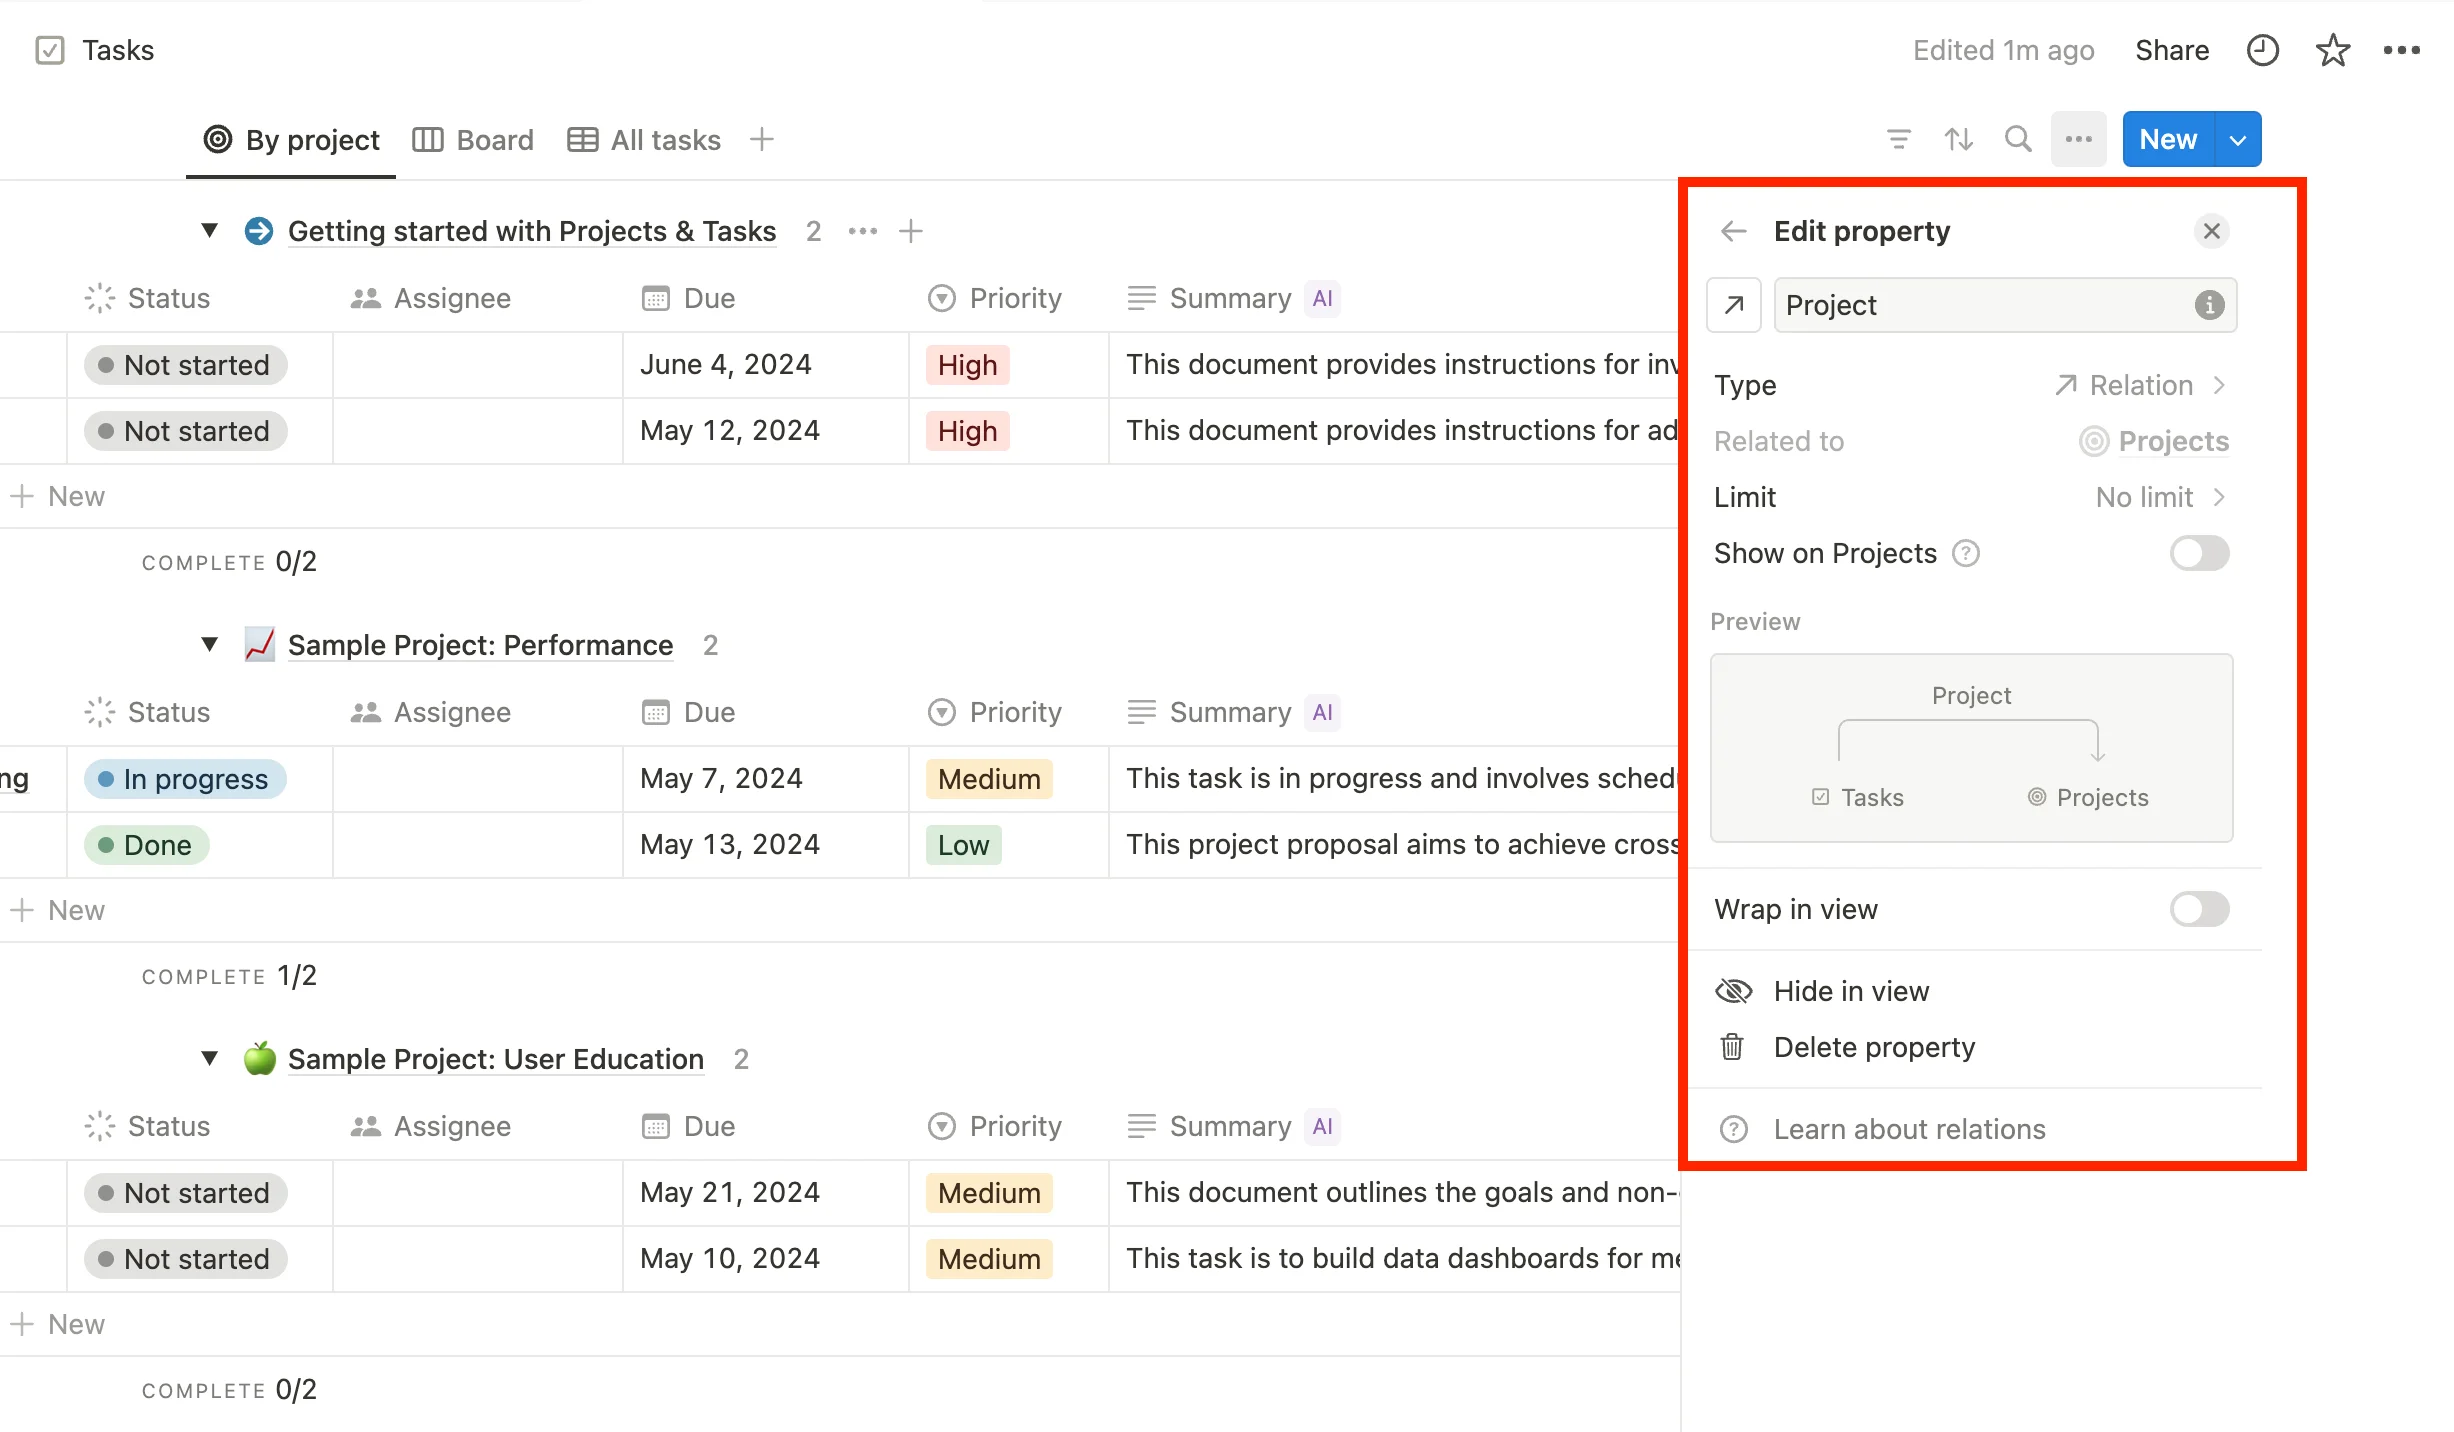
Database Relations (Connect Databases Together)
Notion has a notable capability where you can establish relationships between databases using the relation database property.
This allows you to connect and link information between different databases, enabling you to analyze and access data from multiple perspectives.
To illustrate this, let's have a more common example involving projects and tasks. Imagine you have one database dedicated to tracking projects and another for managing tasks. By setting up a relation between these databases, you can easily establish connections and gain insights into how tasks contribute to specific projects and vice versa.
To set up a relation:
- Add a column/property to your database
- Select "Relation" as the property type
- Choose the related database you want to establish the relation with
- Click "Add relation" to finalize the creation of the relation property
To create a two-way relation between the databases, you can click the “Show on [Database Name]” toggle.
Once the relation property is created, you can add related items to your database entries:
- Click on a cell in the relation column
- Use the menu to search for and select items from the other database
- To add an item, click its name in the list. To remove an item, hover over it and click the "-" button on the right
Collaboration
Notion allows you to share content with everyone, specific teams, or individual collaborators. Each user gets the right level of access, whether it's just for looking, leaving comments, or making edits.
Sharing (with Members & Guests)
Notion offers easy collaboration features that allow you to share your content with others in various ways.
You can share your page with members of your workspace or invite guests from outside your team to collaborate on specific Notion pages.
Sharing with Team Members
Members are people who belong to your organization and have paid access to your workspace.
They can access the workspace with different permission levels: Workspace owner, Membership admin, or Member.
You can find more information about how to add members to Notion and permission levels here.
Sharing Outside Your Team (Guests)
Guests are people from outside your organization that you invite to collaborate on specific pages. They have limited capabilities compared to members.
This is particularly useful when you need to share a specific Notion page with an external contractor or a client.
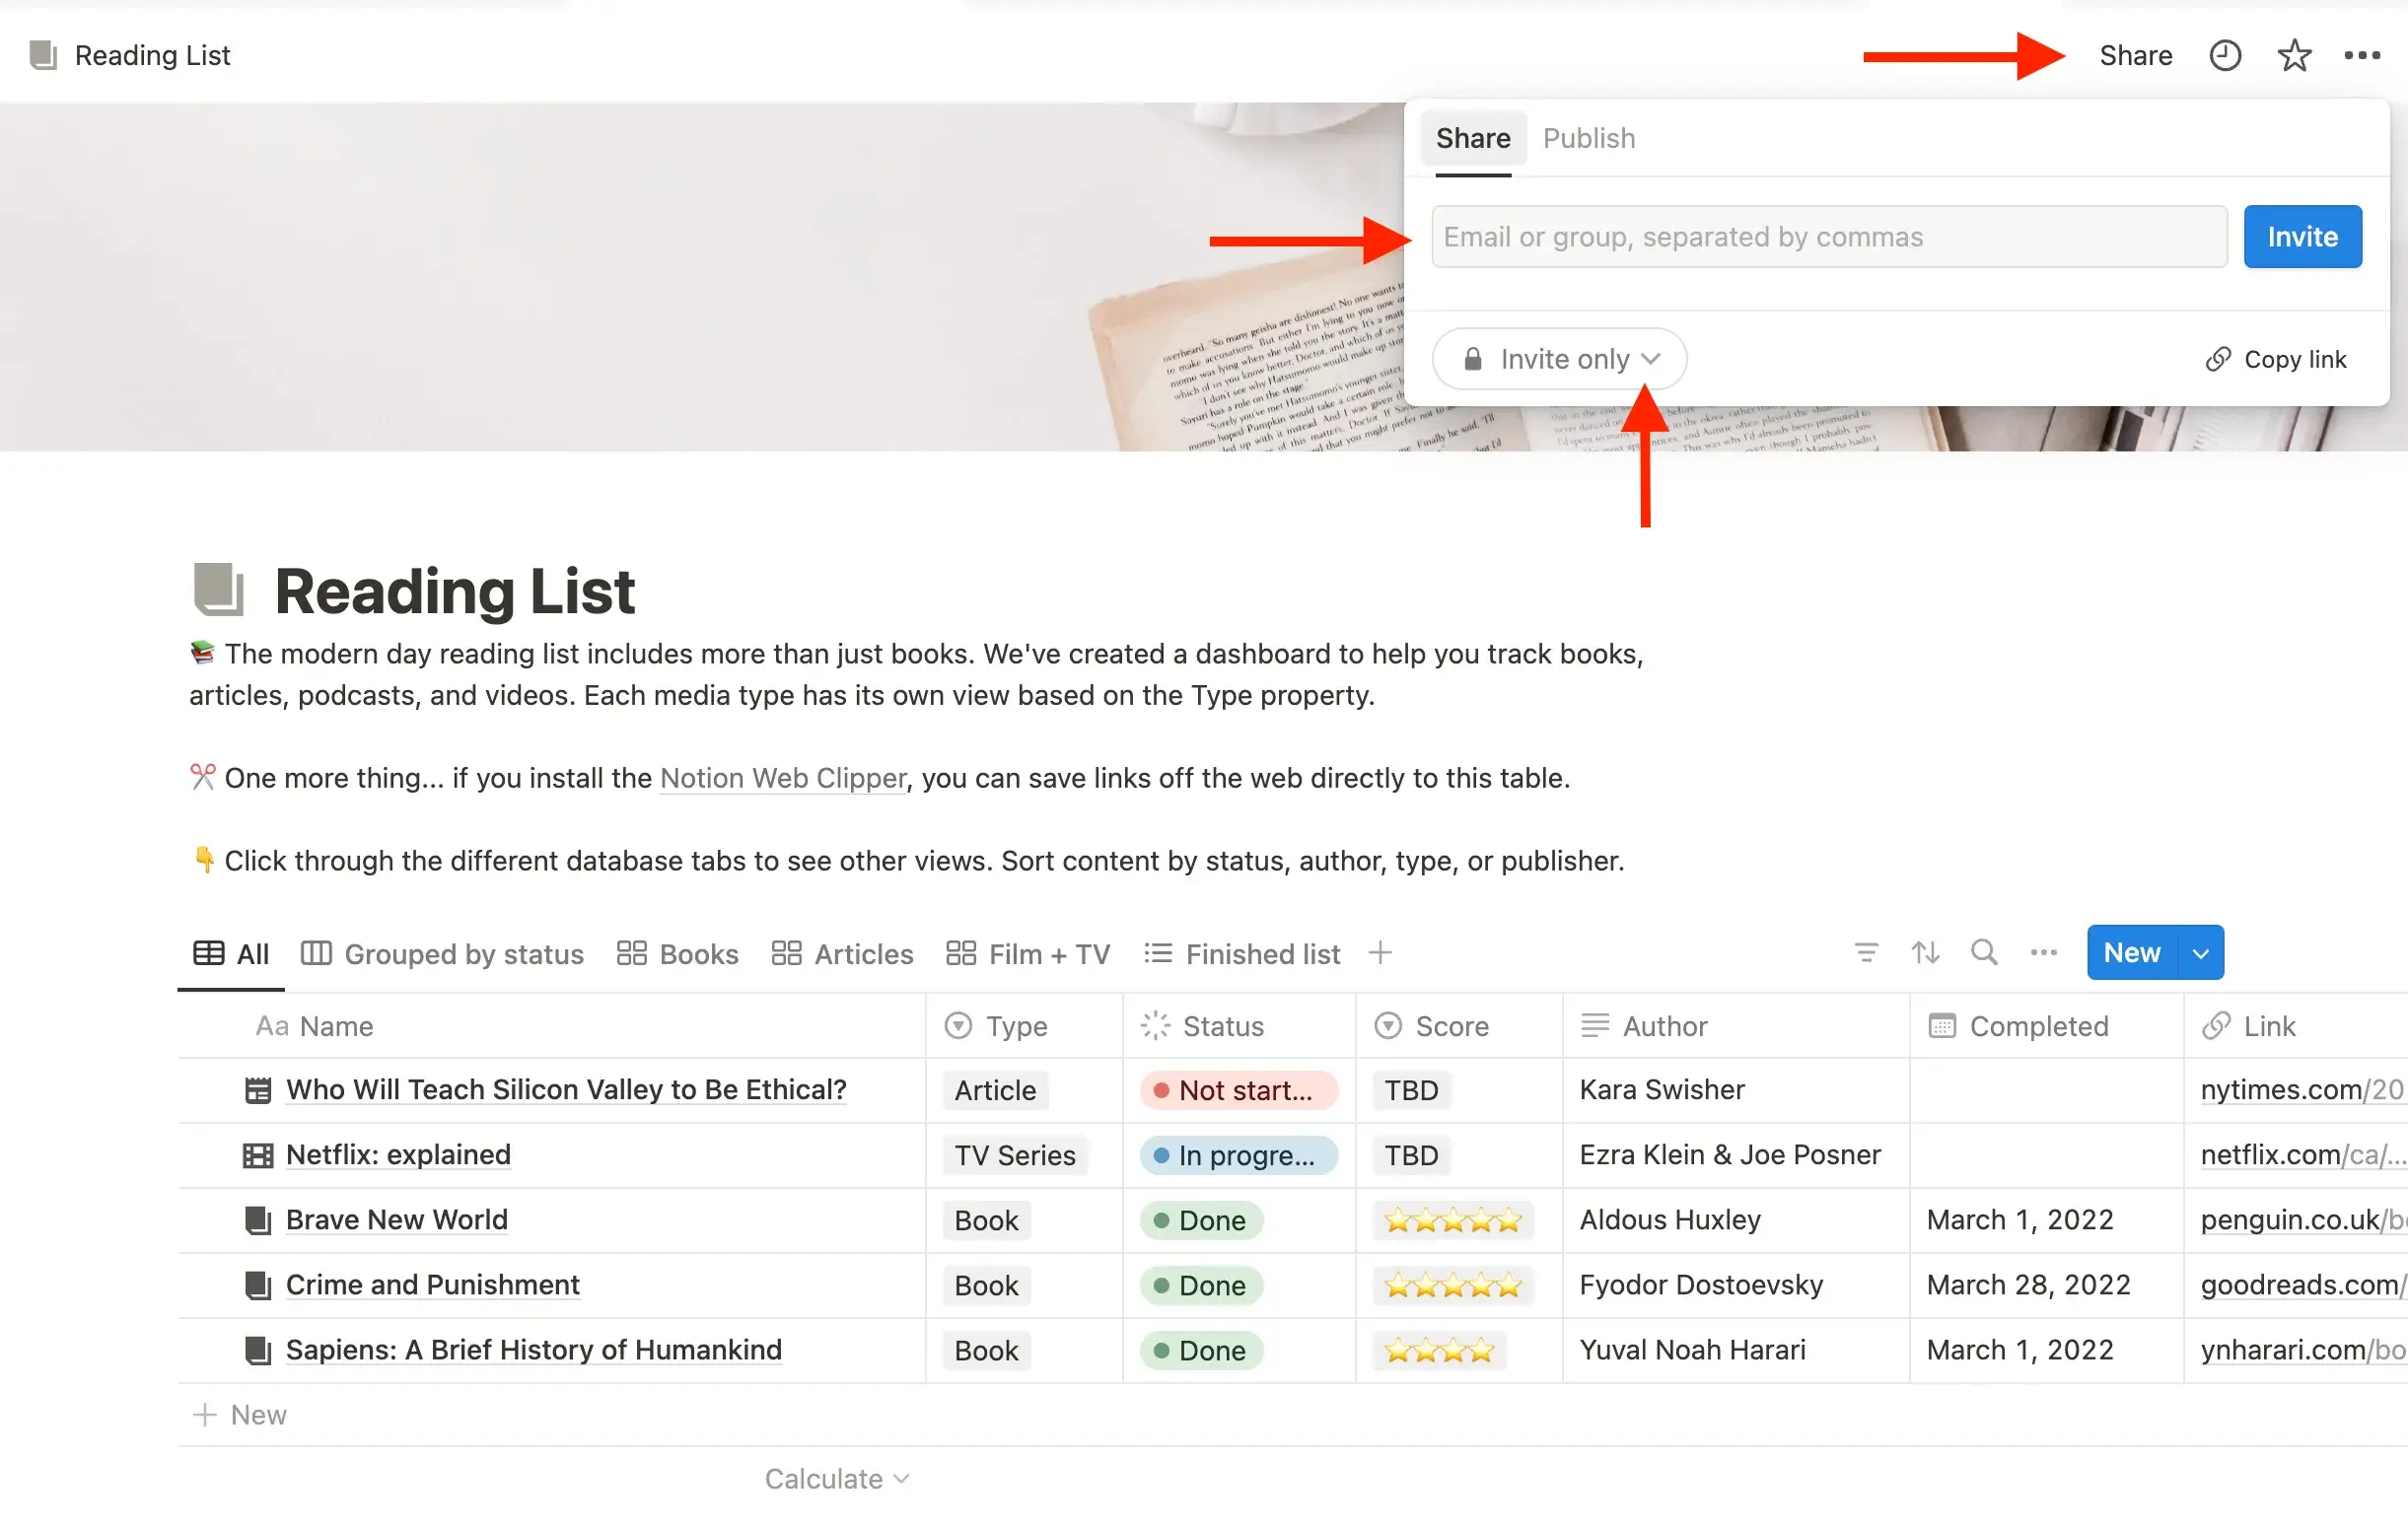
To share a page with guests, follow these quick instructions:
- On the Notion page, click on the "Share" button located at the top right corner.
- Enter guests email addresses and click "Invite." You can customize their access levels from the provided dropdown menu.
- Guests will receive an email containing a link to the page you've invited them to view or edit.
Publishing (Web Pages)
Notion also provides a seamless way to share your pages with non-Notion users by publishing them to the web. This allows anyone with the page's link to view it as a website.
By sharing your Notion pages, you gain flexibility in how your content is presented and how others can engage with it online.
Going Public with Notion
- Publish to the web: Find the ‘Share’ button on your page, hit ‘Publish’ and then ‘Publish to web’. Your content is now live!
- Customize the public web page: After publishing, you've got options. Set your link to expire, allow edits or comments from Notion users, and let others duplicate your page. Plus, you can even get your page appearing in search engine results.
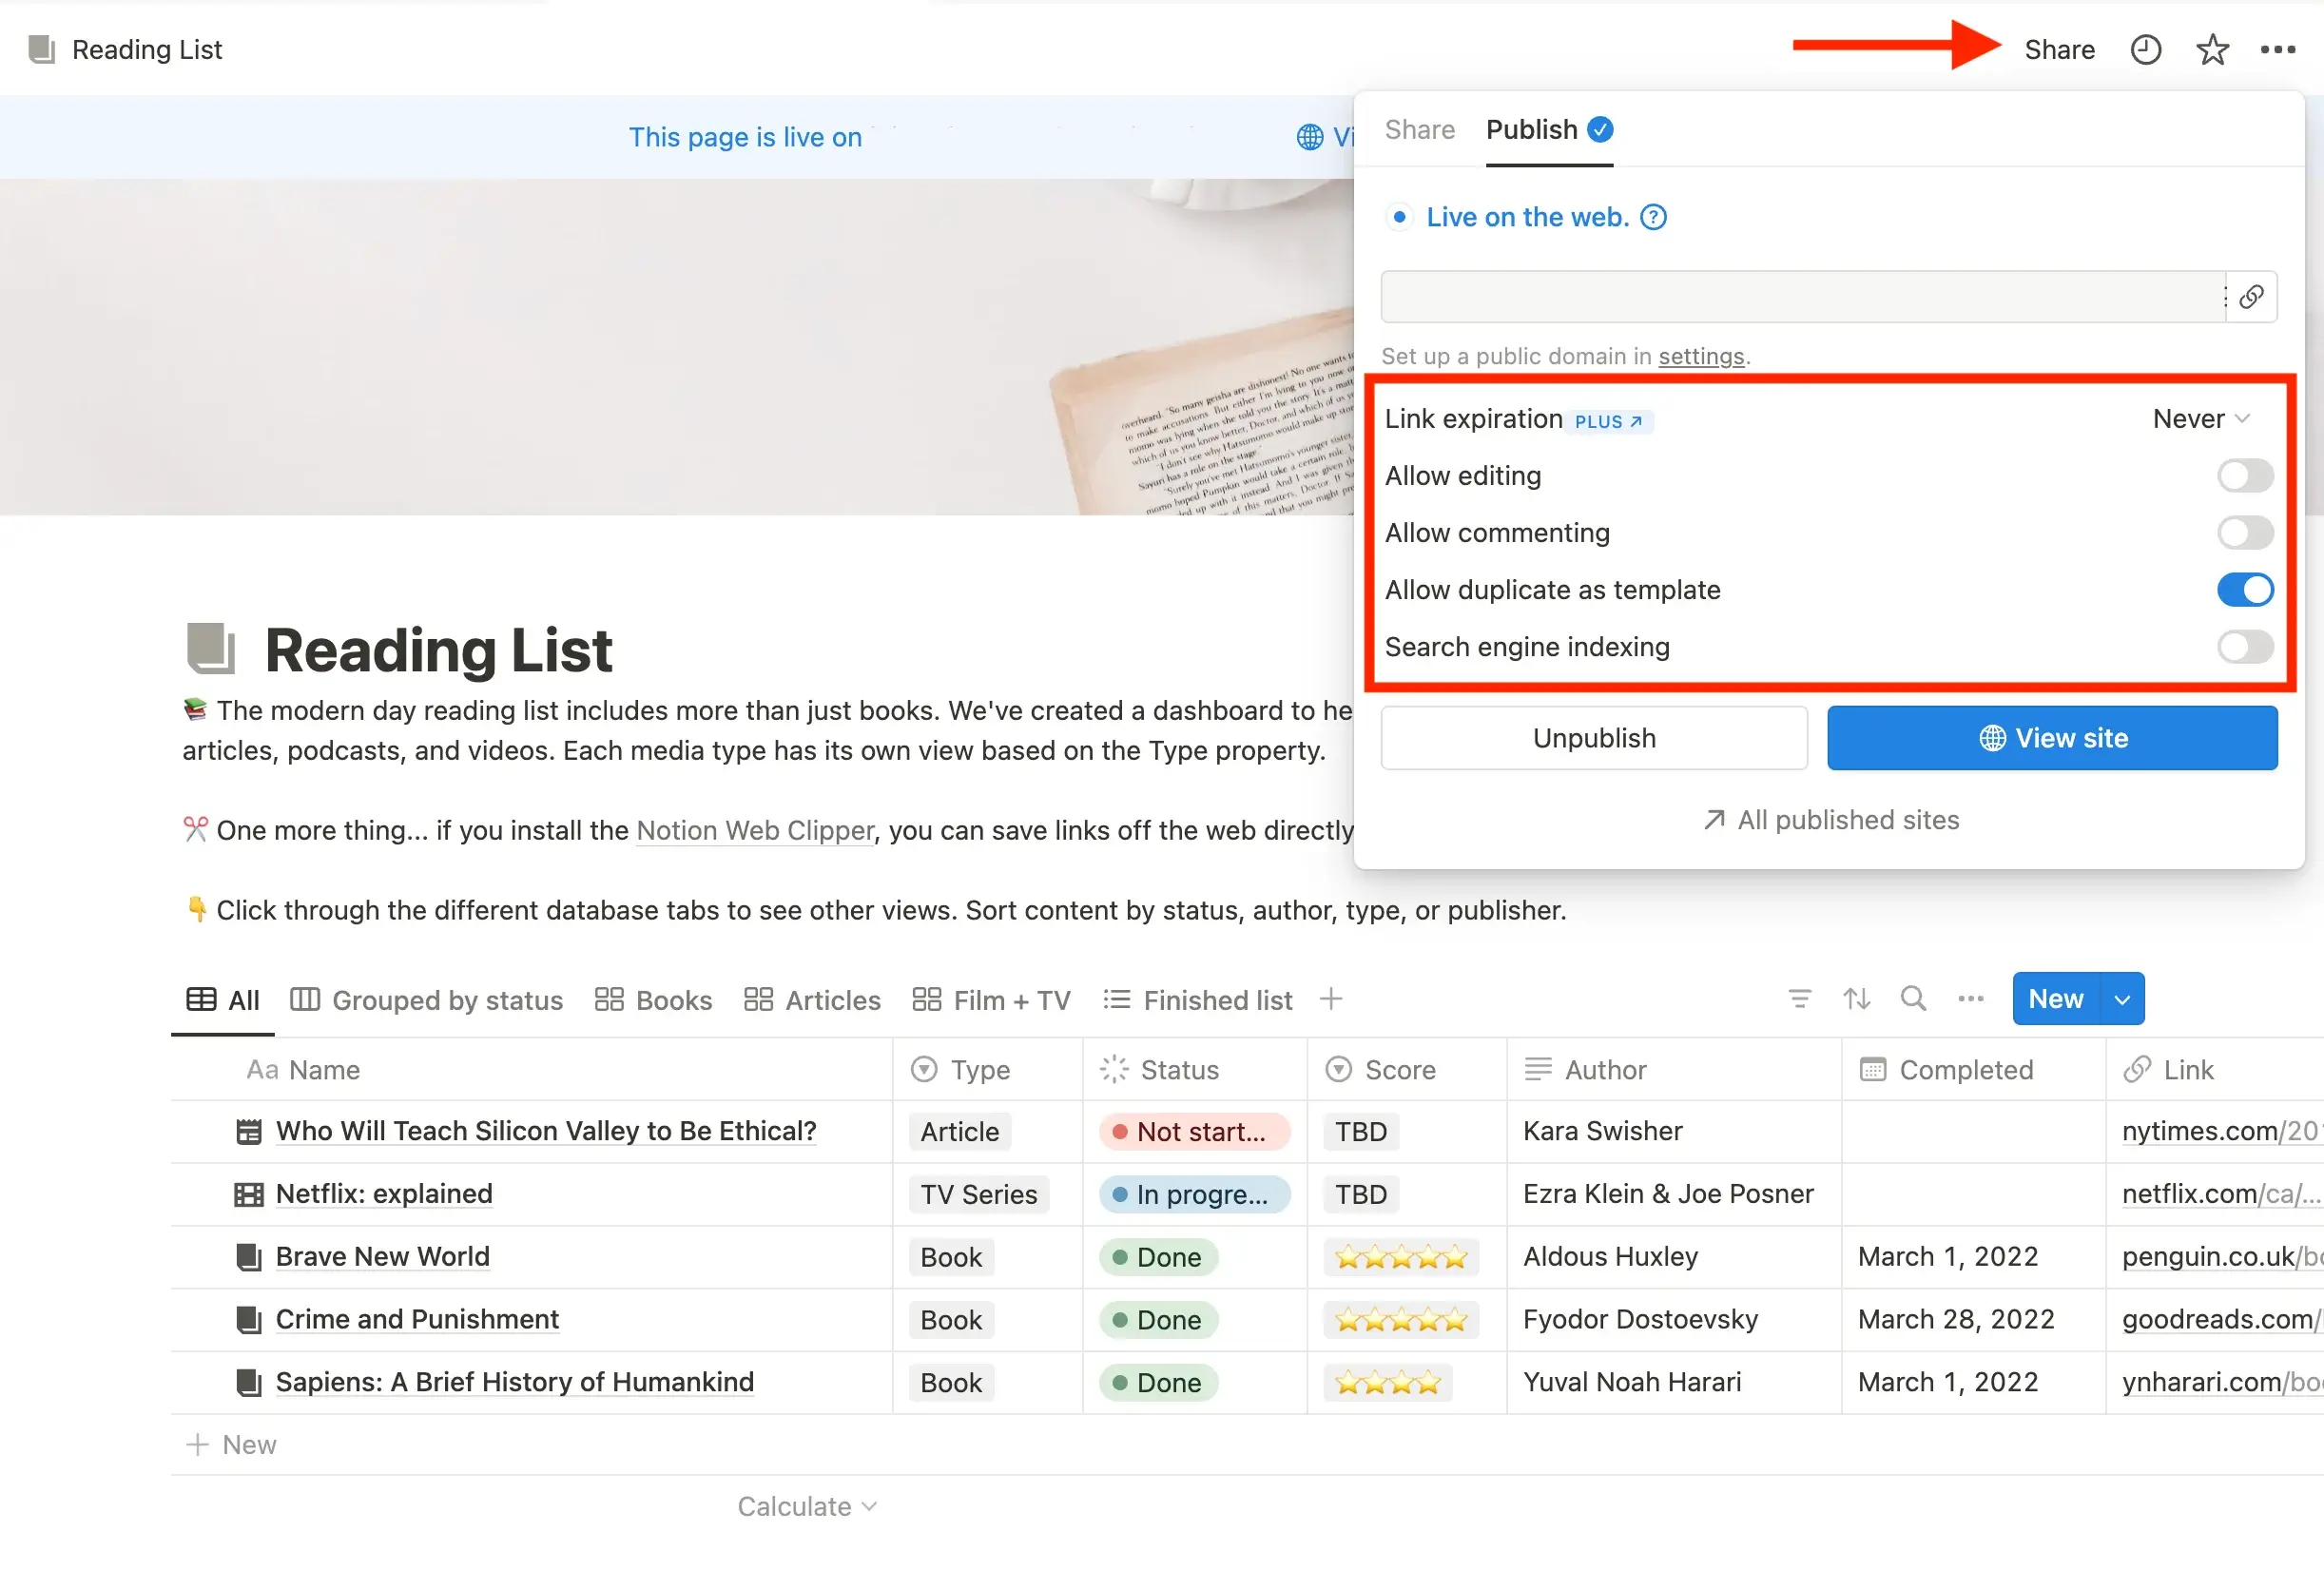
Visitors get more than just a static page. They can explore any subpages, interact with databases, and, if you allow it, edit or comment on the content. It’s an interactive experience.
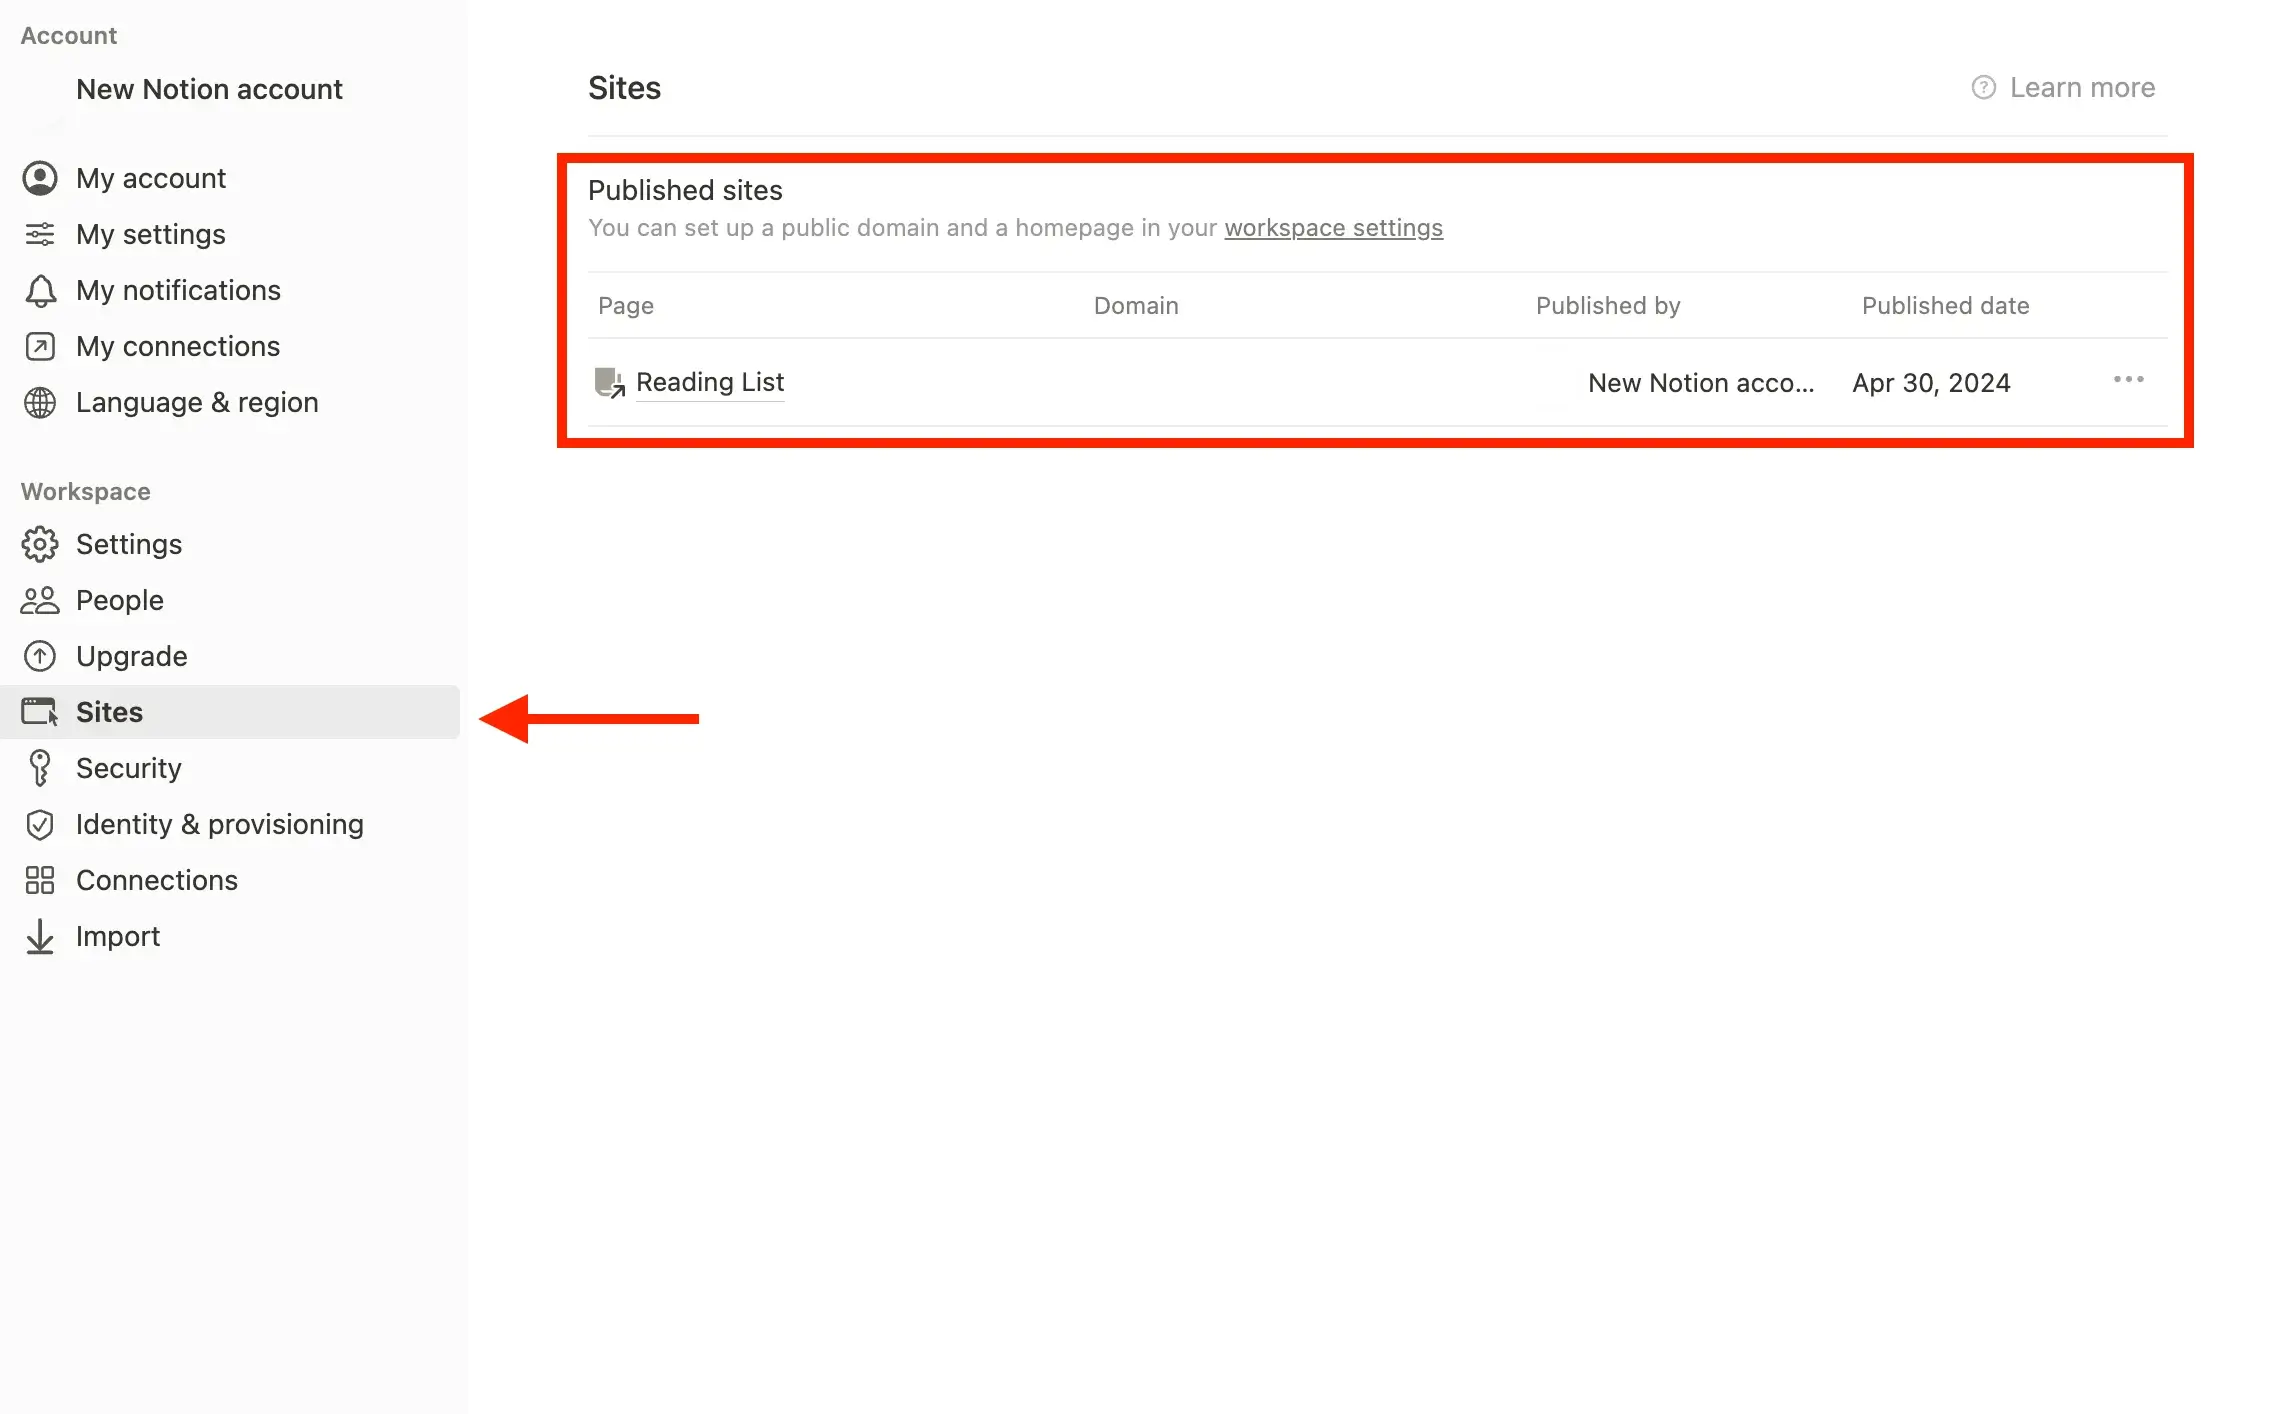
To manage your public pages, access ‘Settings & members → Sites’ for a full rundown of your public pages, where you can adjust settings, copy URLs, or unpublish pages. Plus, you can earmark one of your pages as the default home page for your domain in Notion app.
Templates
Among the various platforms available, Notion has gained popularity for its powerful template system, enabling users to jumpstart their organizational processes.
Basic Templates (Within Notion)
Notion provides a collection of basic templates that are accessible within the app.
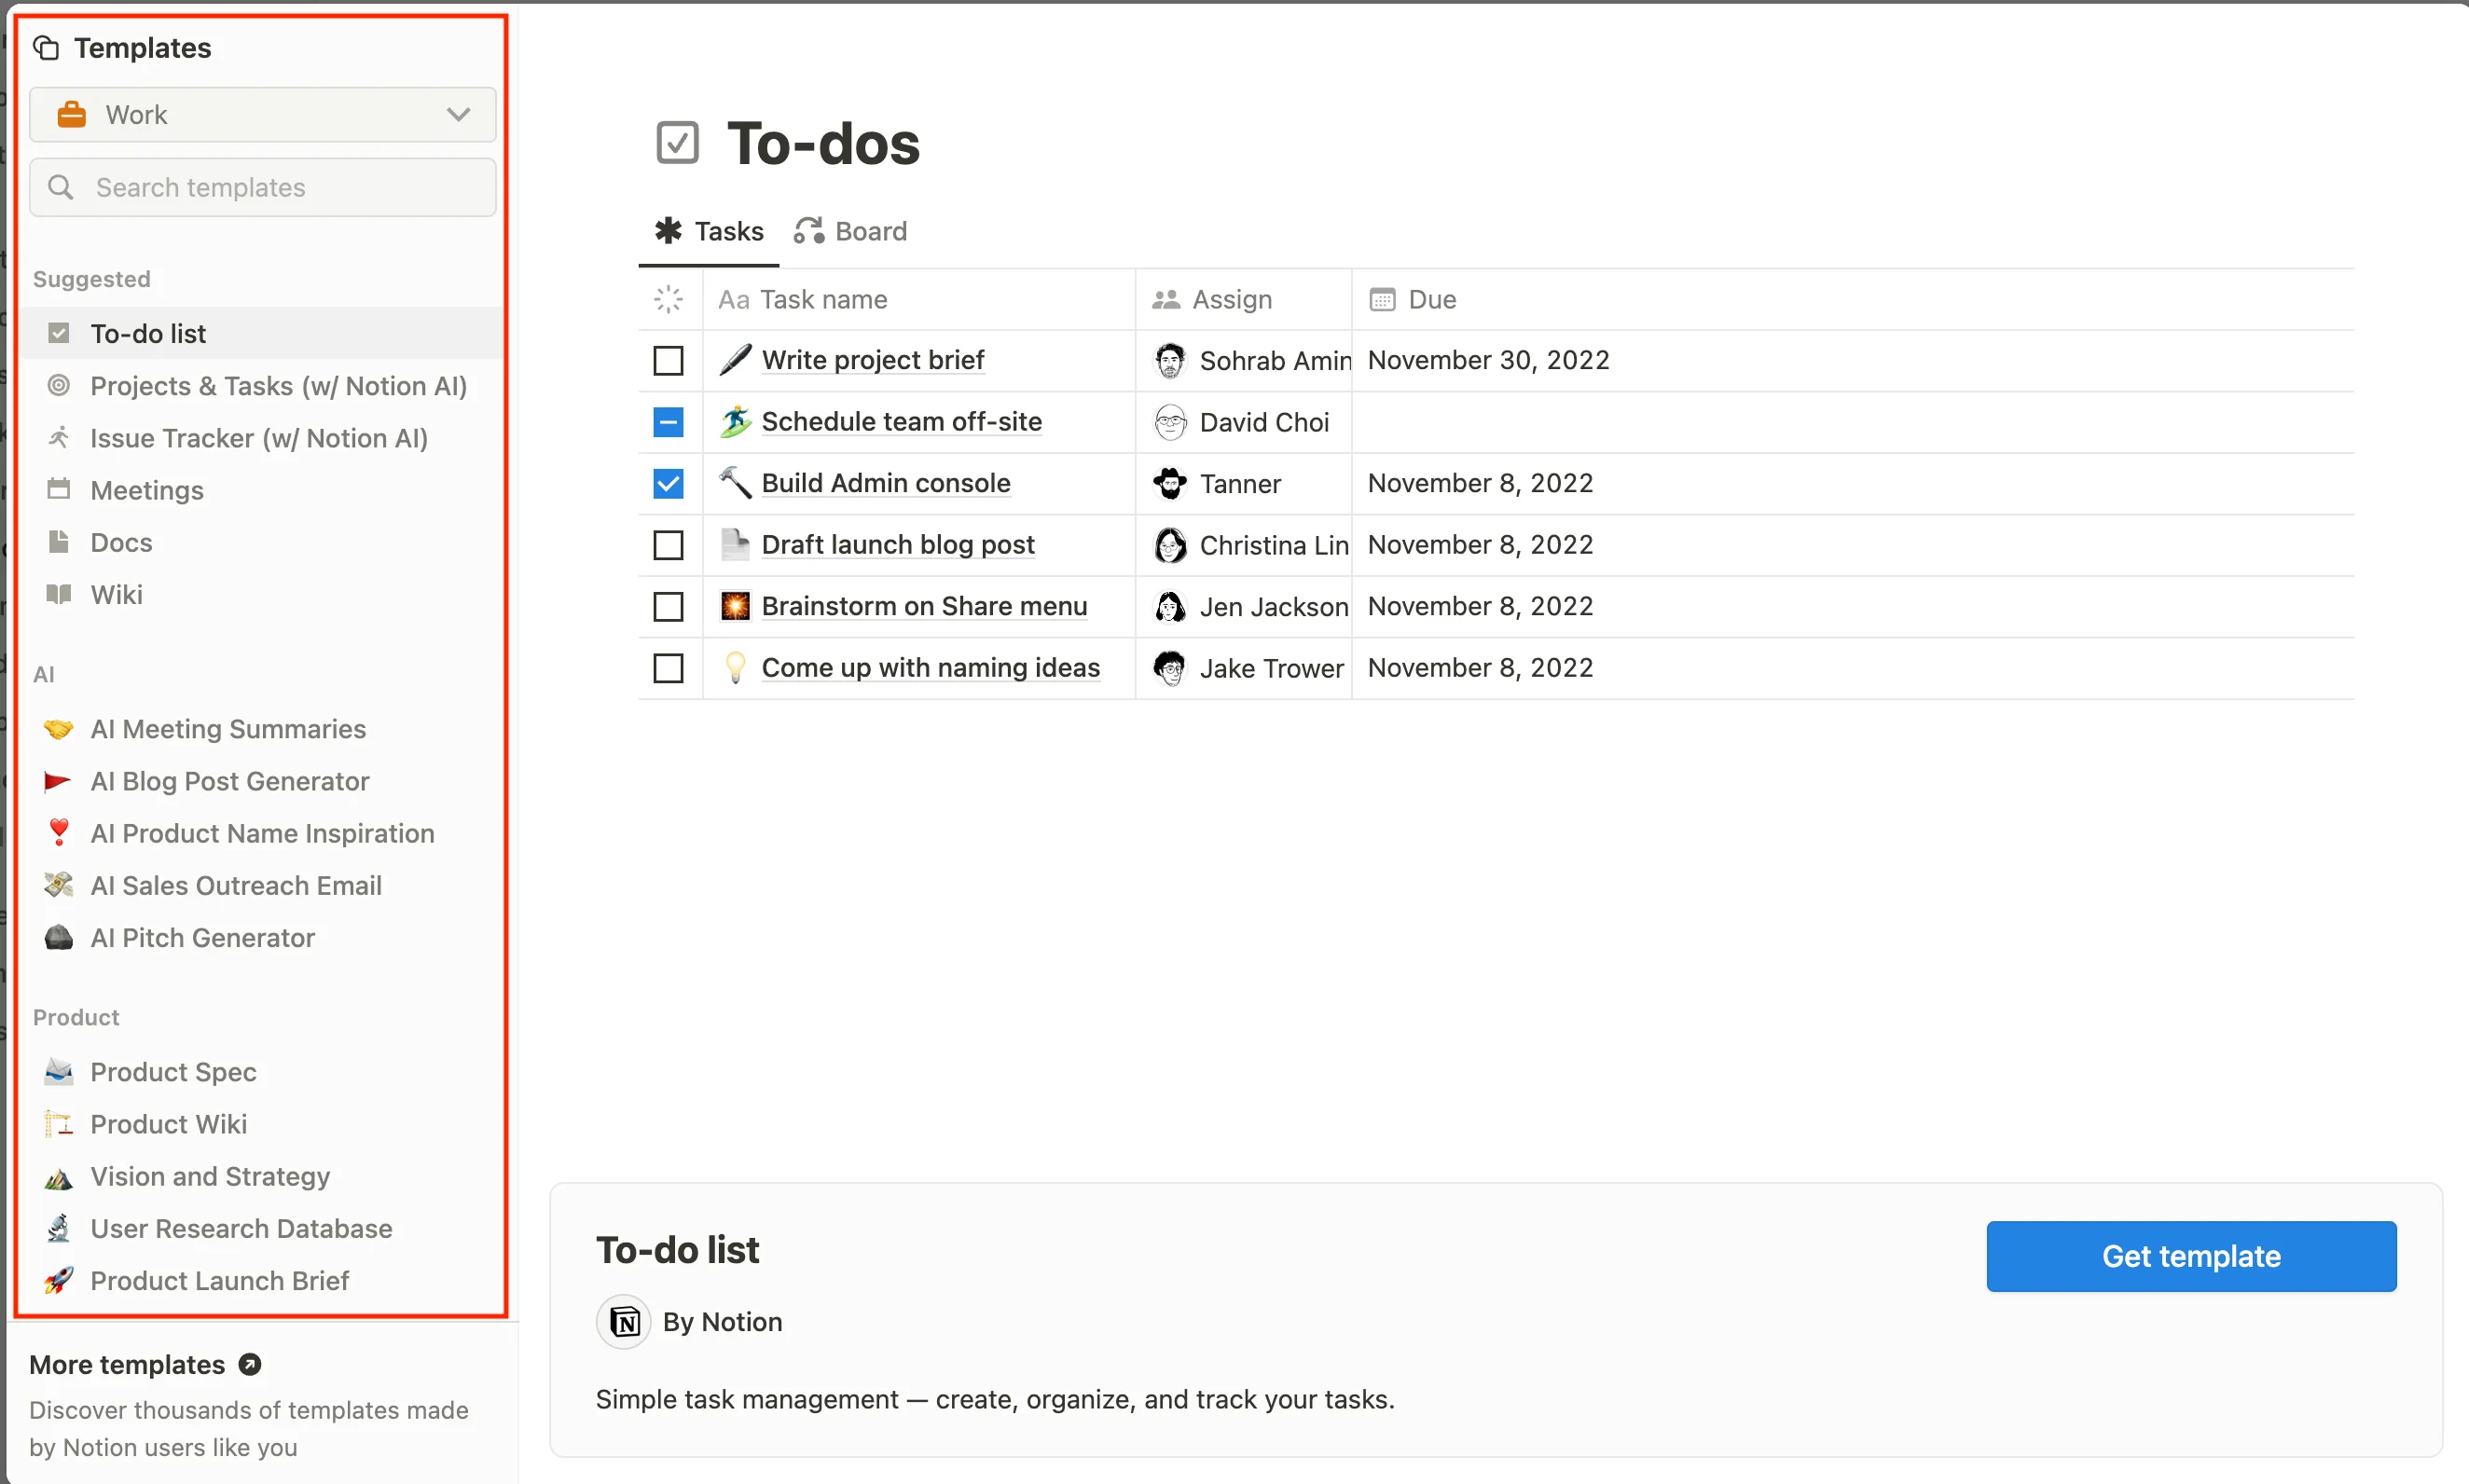
These free Notion templates are categorized into various main categories, including:
- Work
- School
- Personal
- Projects
- Wiki
- Docs
Also, inside each category you will find sub-categories such as Product, AI, Marketing, Engineering, Design, Startup, Operations, Sales, etc. You can find a template for every direction of your work.

To access these free Notion templates, you can navigate to the "Templates" section located in the sidebar of your Notion workspace.
Once there, you will find a lot of options neatly organized into different categories. These categories cater to a wide range of needs, ensuring that you can find templates tailored to your specific requirements.
Advanced Templates (Notion Everything)
If you are looking to take your use of Notion to the next level, you may need a more advanced system with additional features.
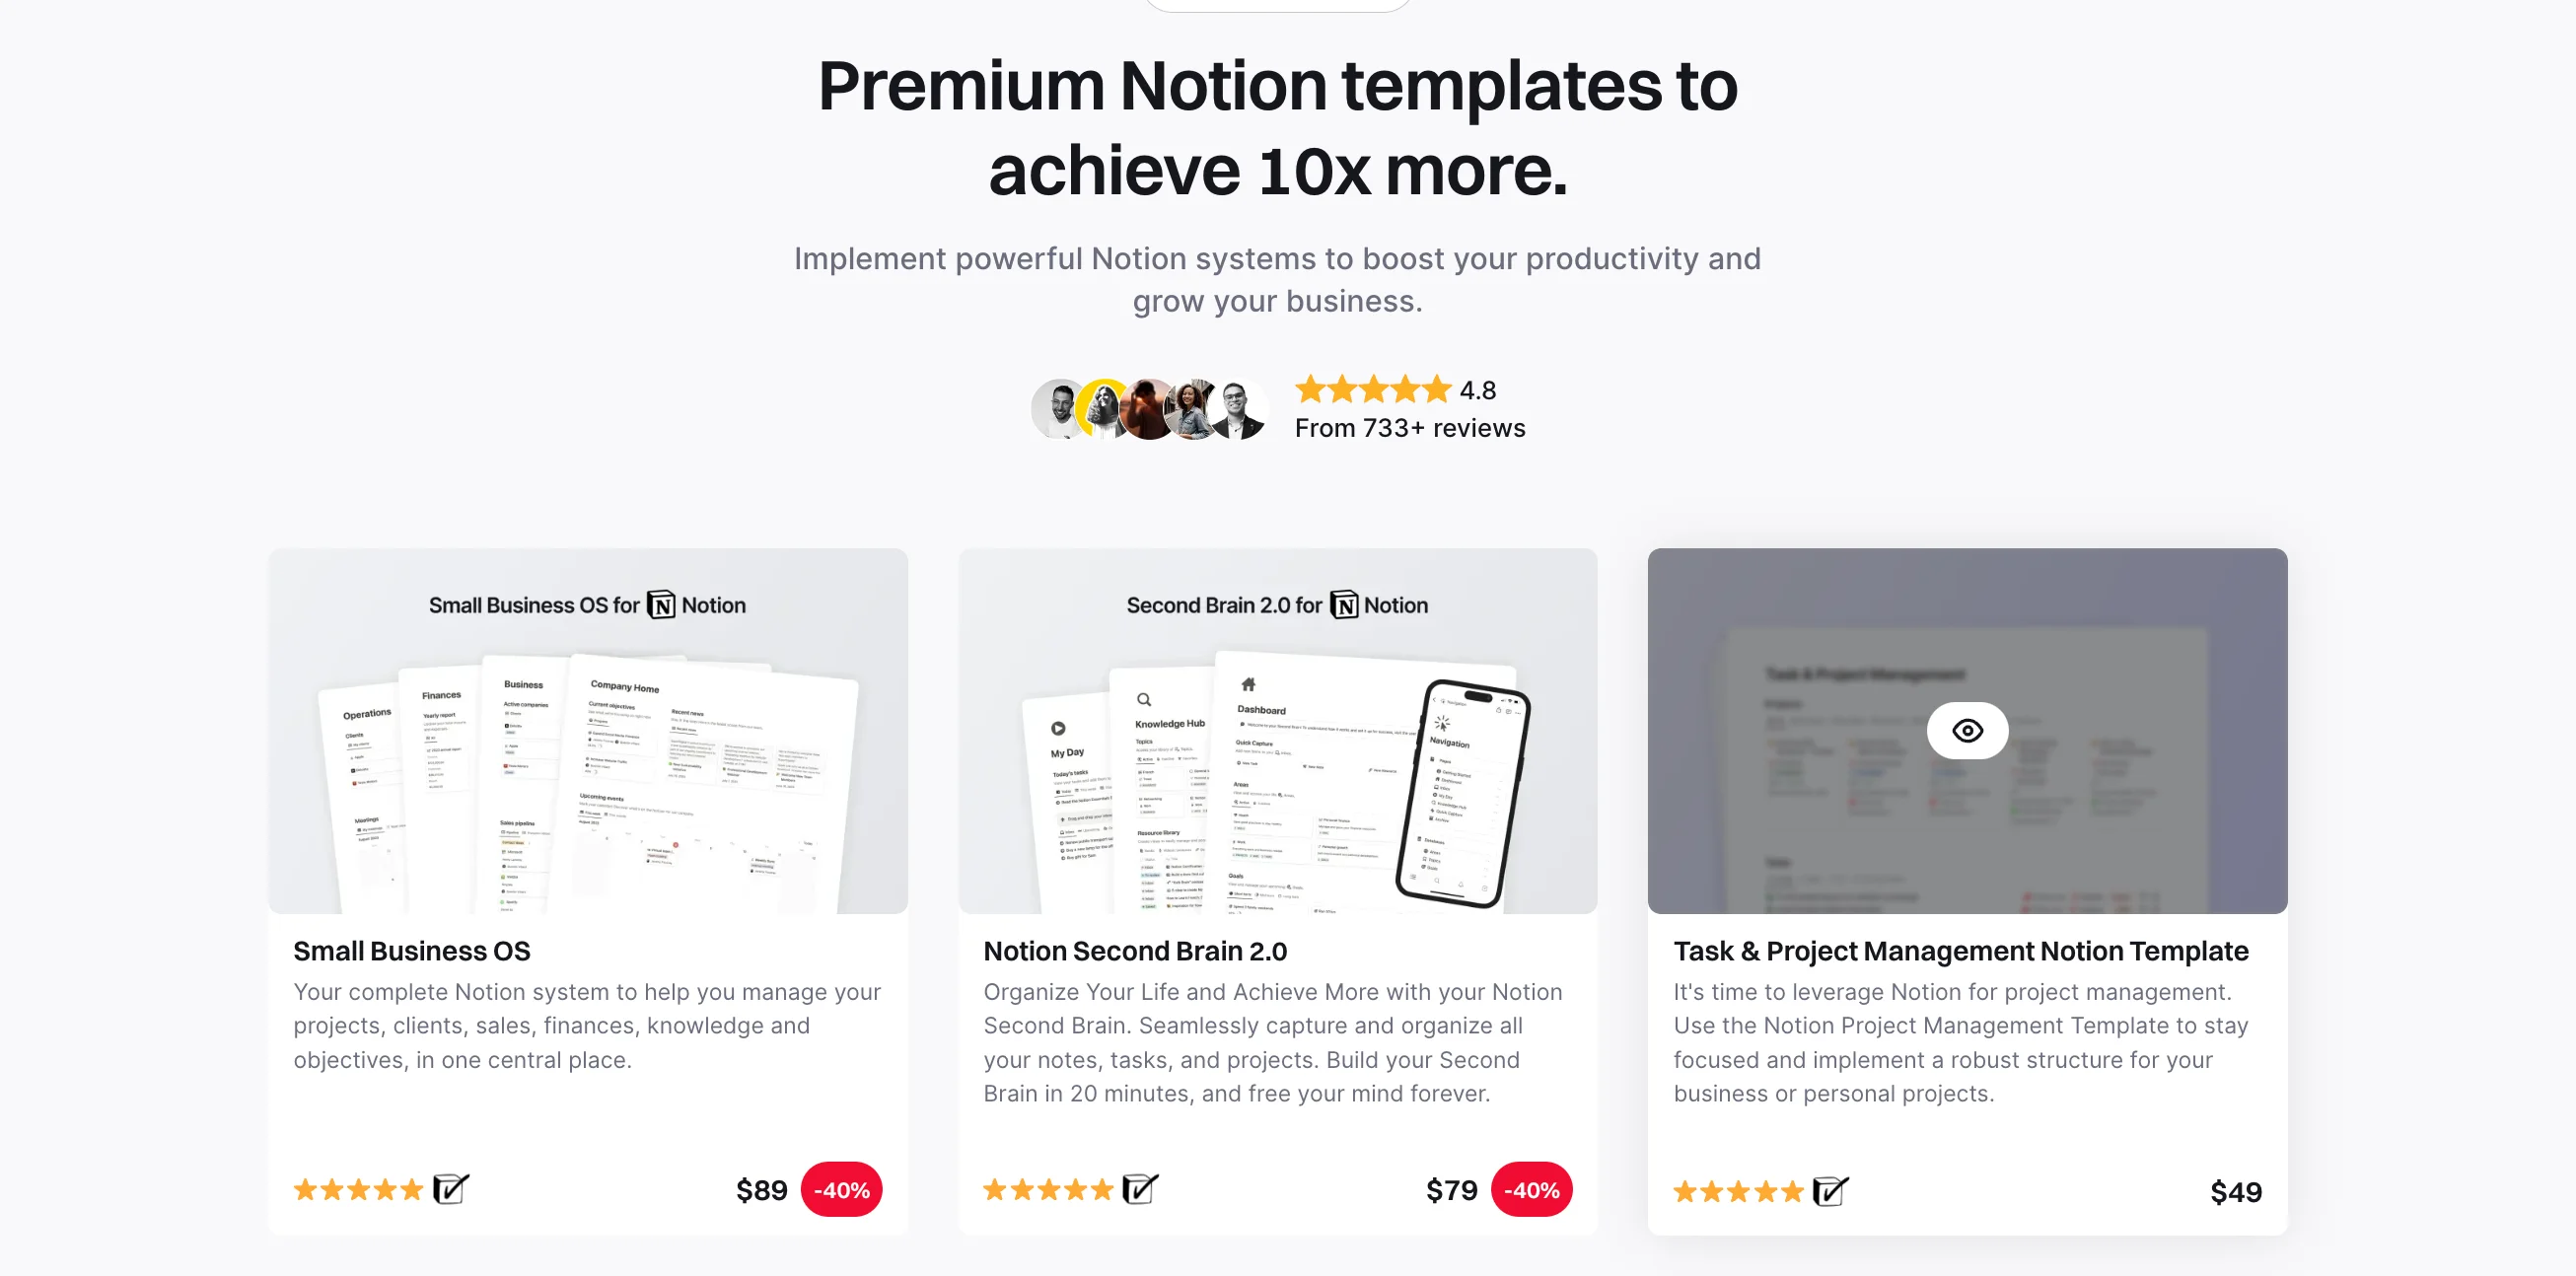
While free templates can help you get started, there are also more complete premium Notion systems available.
These advanced systems come with detailed documentation to help you use them simply and quickly, as well as support from the creators to answer any questions you may have.
At Notion Everything, we have developed several advanced Notion systems to suit various needs.
If you want to organize your life and work all in one place, you can check our Second Brain template, a game-changer among others.
Alternatively, if you're searching for an advanced solution to enhance your business operations, try our Notion Small Business OS template.
Finally, if you are looking for free Notion templates with more advanced features than those available directly on the Notion application, you can choose from the many free templates we have created.
They cover many use cases for both personal and business needs (including task management, to-do lists, note taking, habit tracking, journaling, goal tracking and more).
I hope you found this Notion tutorial for beginners useful, and that you now feel confident enough to make the most out of this fantastic app.
If you already feel ready to take your life and business organization to the next level with Notion, then go take a look at our premium Notion templates, all created by certified Notion experts.